
Fitness businesses can always find new ways to motivate customers to sign up for a membership. But the real struggle is in retaining those customers. While there’s not a whole lot you can do when it comes to getting people to use their membership, you can design your website to attract the right kinds of gym-goers — ones who want to work hard and get results.
In this tutorial, we’ll show you how to edit the high-impact image in the Hero Slider with Midjourney Image Effect template and use it to sign up those highly motivated customers.
Table of Contents:
- Step 1: Delete social media
- Step 2: Create and upload midjourney images
- Step 3: Edit the title
- Step 4: Edit the subtitle
- Step 5: Edit the supporting text
- Step 6: Customize the dripping effect
- Step 7: Adjust the overlay
- Step 8: Update button and hover effects
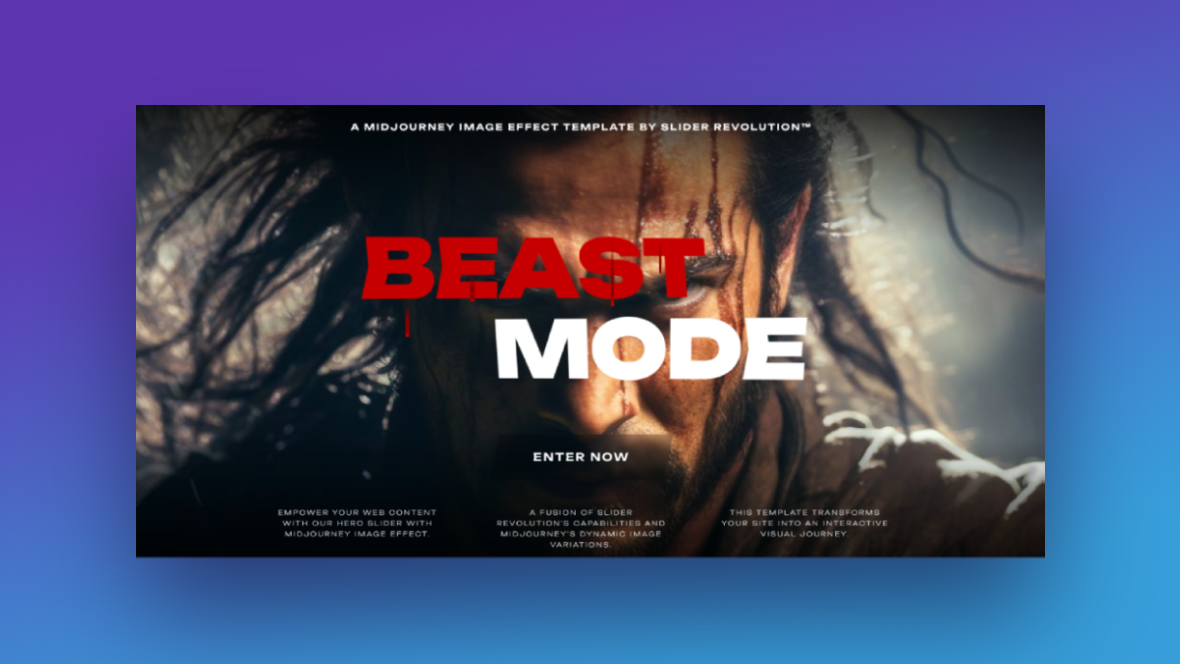
How to design a high-impact image to motivate more users to sign up
If you take a look at the Hero Slider with Midjourney Image Effect template, it looks like something pulled from an action movie. Think Kill Bill or John Wick.
You can easily repurpose this high-impact image for less bloody ventures. In the tutorial below, we’ll show you how to keep the general concept, but modify the styling and content for your fitness or sports facility.
If you’ve never used Slider Revolution before, read through these quick-start guides to get the lay of the land first:
Step 1: Delete social media
If you’re using this template to create a splash page or microsite, you can leave the social media icon bar where it is on the right. You’ll just have to update the links (and/or the icons).
If this high-impact image is going to be the hero section on your home page, then you aren’t going to need the social media piece.
To delete these icons, locate the group in the timeline editor called Social-Media.
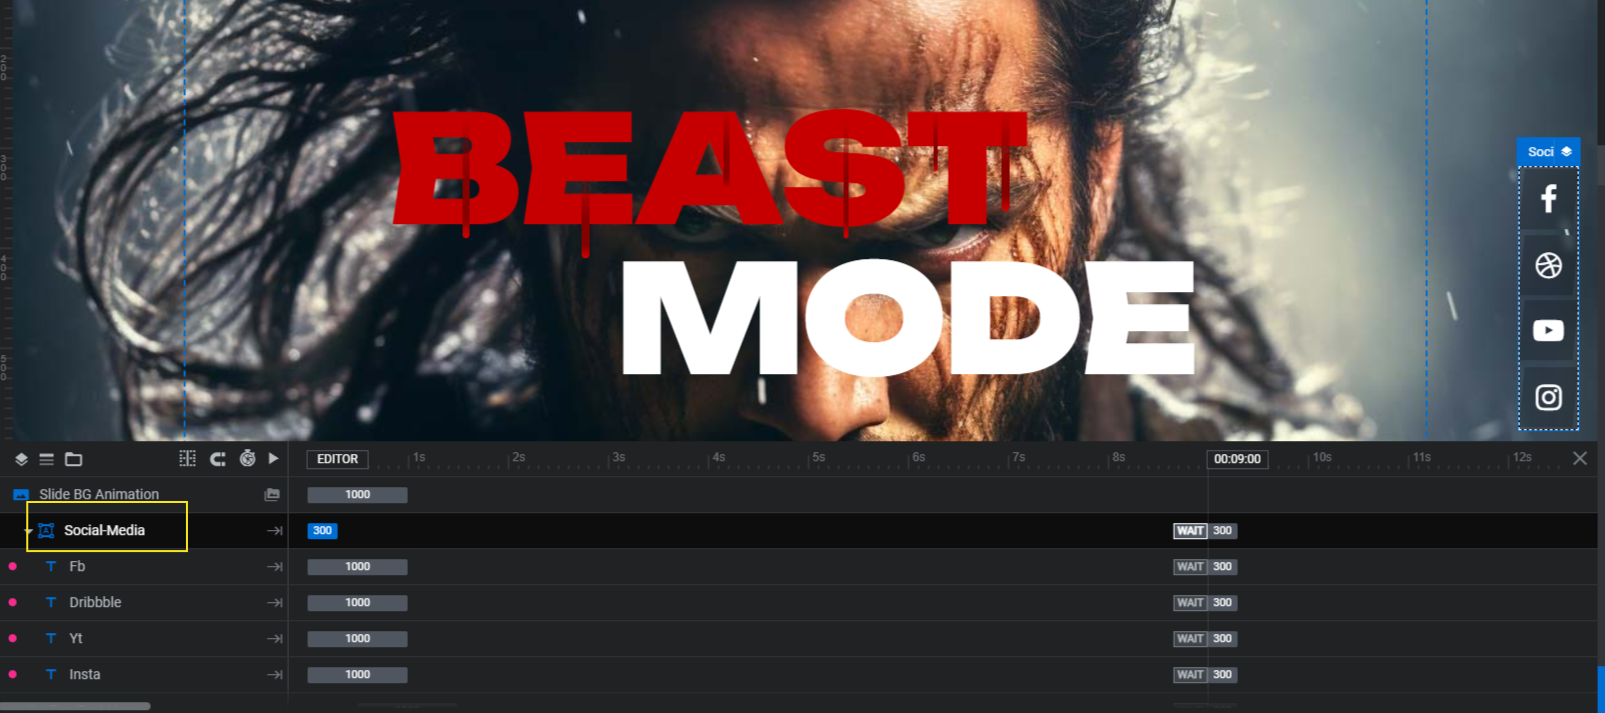
Click on it and then hit the Backspace or delete key. This will delete the entire block of icons.
Learn more:
Step 2: Create and upload midjourney images
To create the hurried and chaotic image in your hero section, you’re going to piece together eight different images. The settings are already configured for you. All you need to do is create and upload the images.
One way to create these images is by taking photos of your subject using a time-lapse setting. Another option is to take a video file and convert it into separate image files. The end result will be similar.
We created ours using a stock video file.
First, we sped it up to remove the original slow-motion effect from it. The video should run at a normal-to-fast speed.
Next, we cropped it down to six seconds. The video file really doesn’t need to be that long since you’re only going to use a couple seconds’ worth of it to create the midjourney image.
Lastly, we ran the video file through the free Online Converter tool.
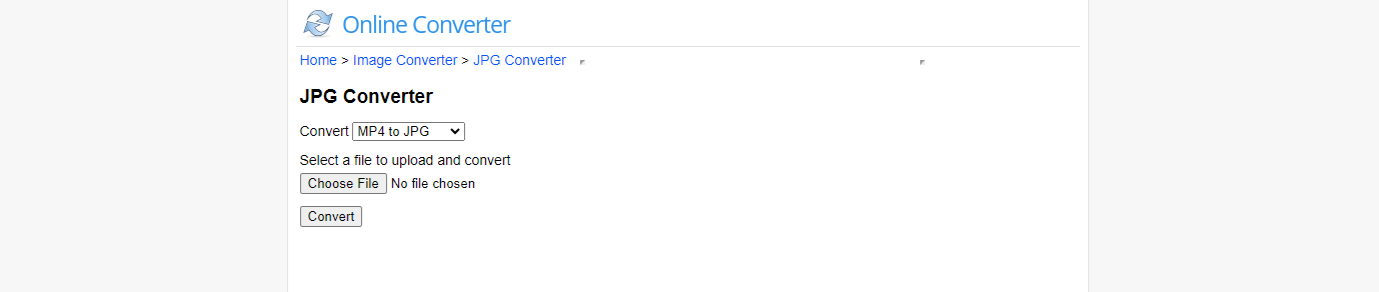
Set it to convert from MP4 (or whatever your video format is) to JPG. Select your file and then hit the “Convert” button.
The download file will contain over a hundred stills from your video.
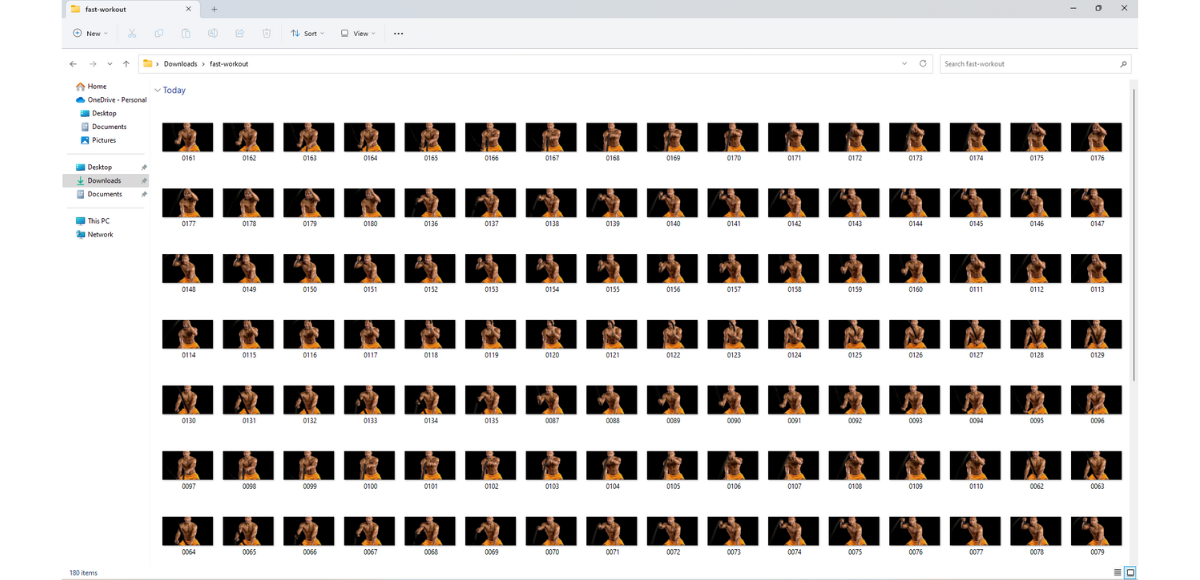
To create an effect similar to the one in the template, select images with some time between them. For instance, we selected every sixth image for ours.
Note: If you want your visitors to get the gist of what’s going on, the stills should appear in the same order as they originally were in your video or photoshoot. If you want it to appear more chaotic, play around with the order.
Once you have your images ready to go, return to Slider Revolution.
Go to “Slide Options” and “Background”. Upload the first image for the sequence to the Media Library.
Then go to the timeline editor at the bottom. Scroll down to the group of layers called Image-Flipper. Go through each — in numerical order — and replace the images with the next ones in the sequence.

You won’t be able to see these images updated in the canvas, so you should open the Preview to make sure you’re happy with your custom midjourney image effect.
Learn more:
Step 3: Edit the title
There are two layers that make up the main title in the center of the hero image: Title and Title-2.
To edit what these layers say, select them one at a time. Then replace the text in the editor block under “Layer Options” and “Content”.
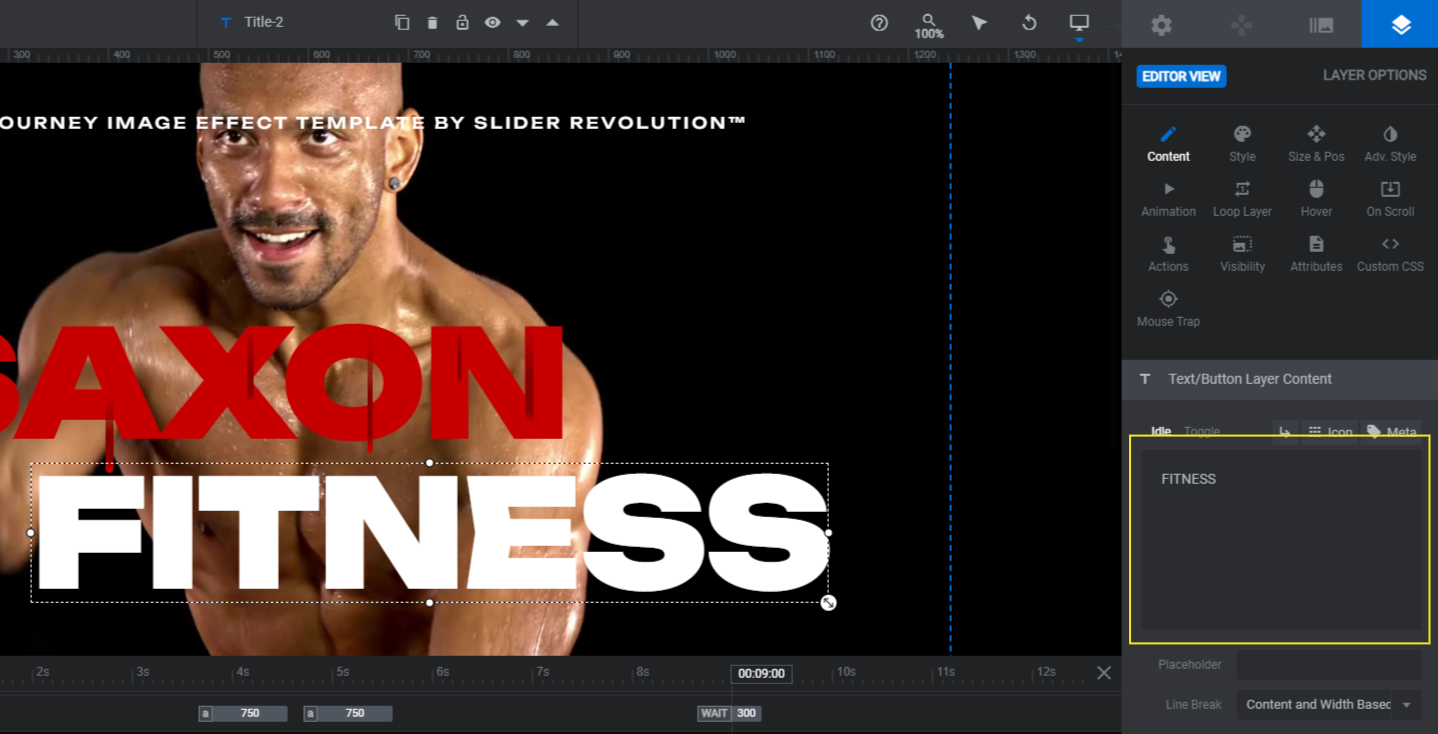
Next, use the “Style” settings to change the font, color, and general styling of the text.
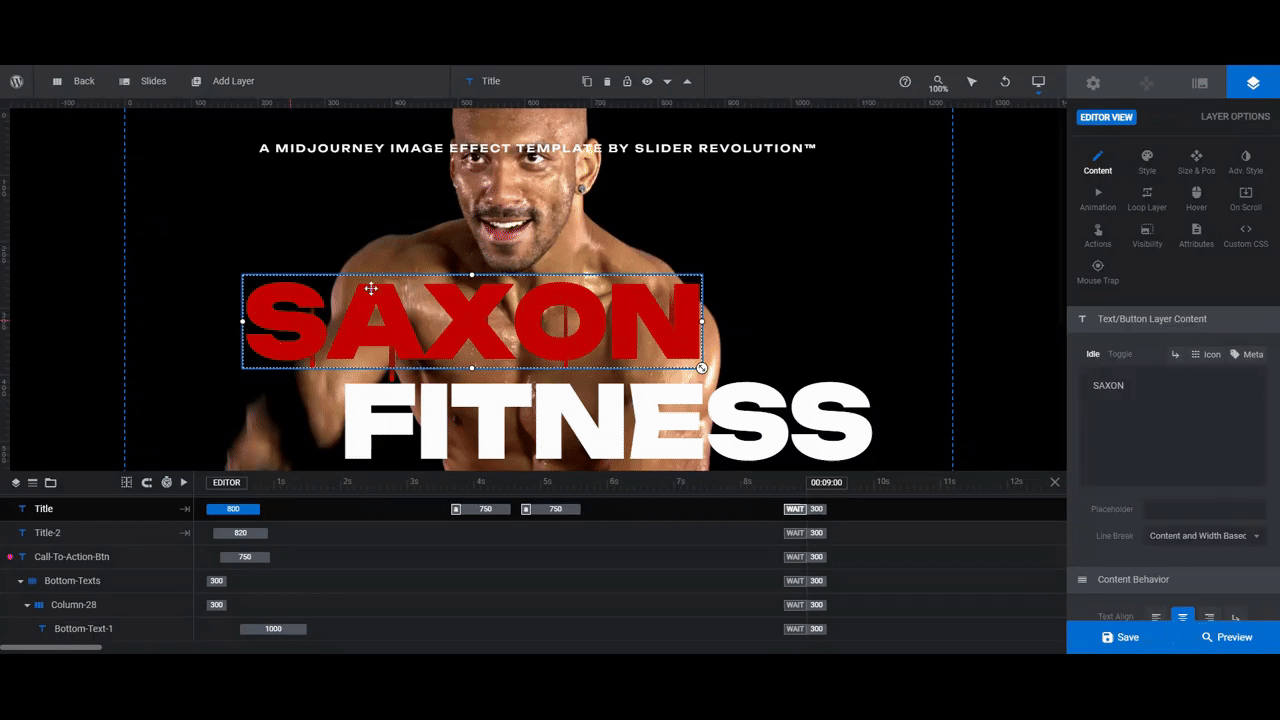
If you change the color of either line, go to “Animation” next.
You’ll see that there are keyframes called turn white and turn red. To update the color of either of these keyframes, click on them. Then scroll down and select the “Color” tab under Advanced. Update the color as needed.
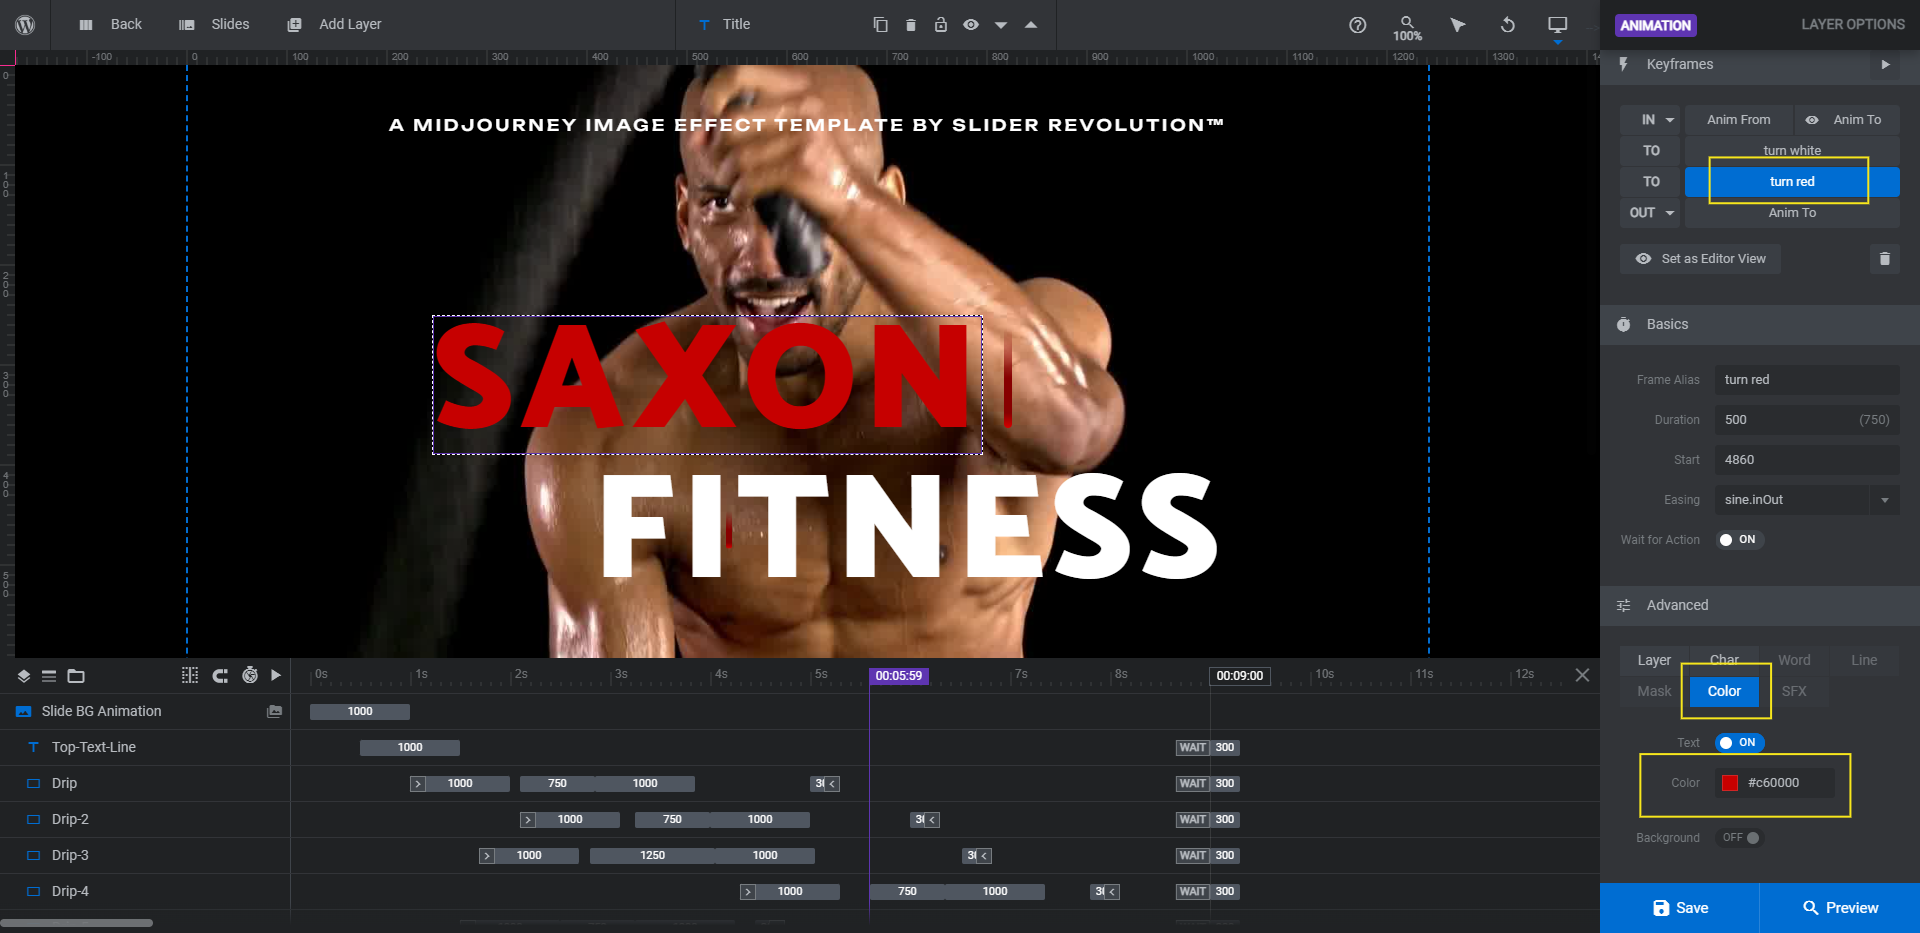
Save your changes when you’re done.
Learn more:
Step 4: Edit the subtitle
There’s nothing out of the ordinary when it comes to the subtitle called Top-Text-Line that sits at the top of your high-impact hero image.
To update it, use the “Content” and “Style” settings as you did for the main headline.
Although there’s a dark overlay behind this text line (created using the Gradient-Overlay layer), it’s still a good idea to preview it on the frontend to make sure it’s clear and easy to read. Save your changes when you’re satisfied with the edits.
Step 5: Edit the supporting text
There are three text blocks at the bottom of this hero section. You can use them to tout the benefits or features of your business.
Use the same settings to edit these layers as you did the title and subtitle.
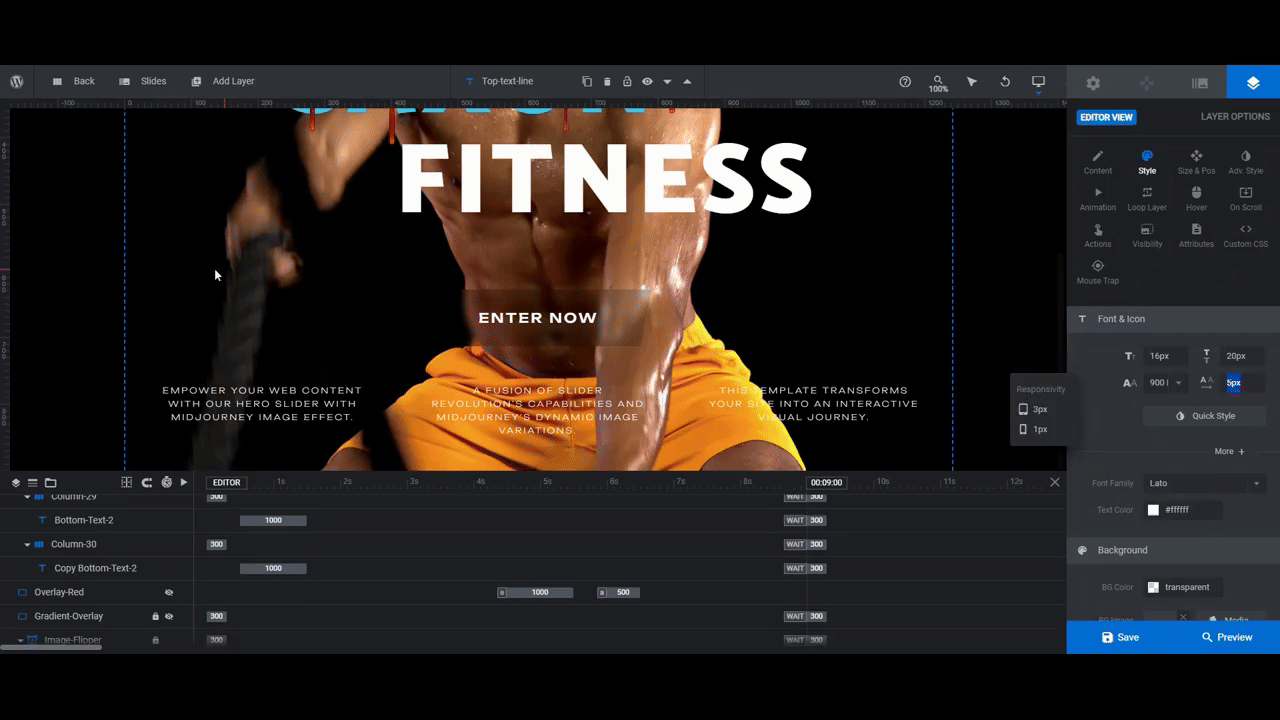
One thing to keep in mind is that there are three side-by-side layers here. To maintain balance in your design, include the same amount of text more or less in each.
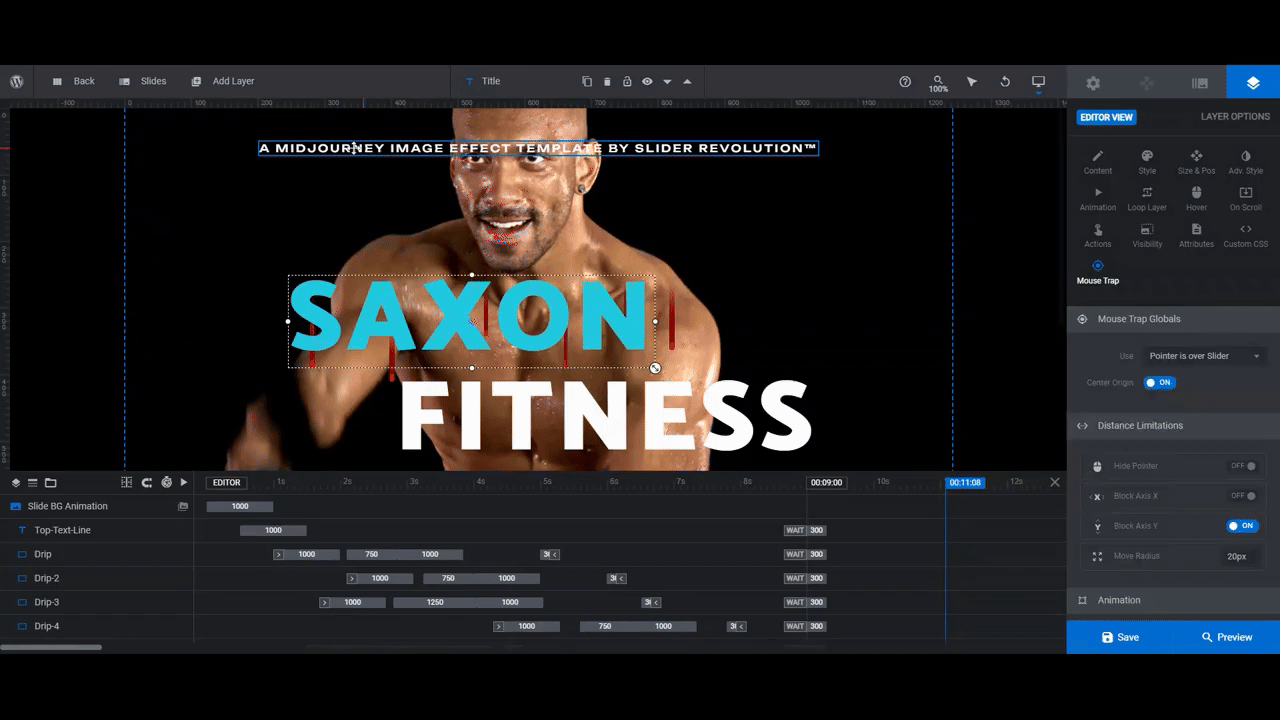
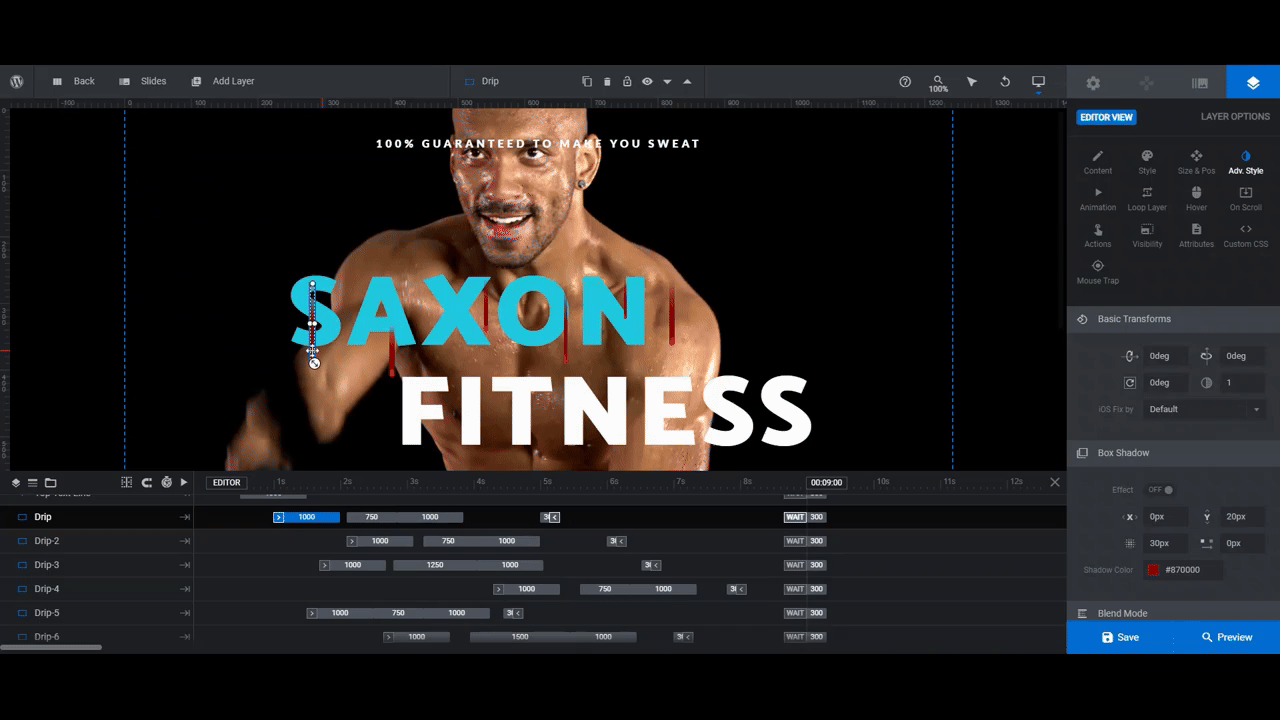
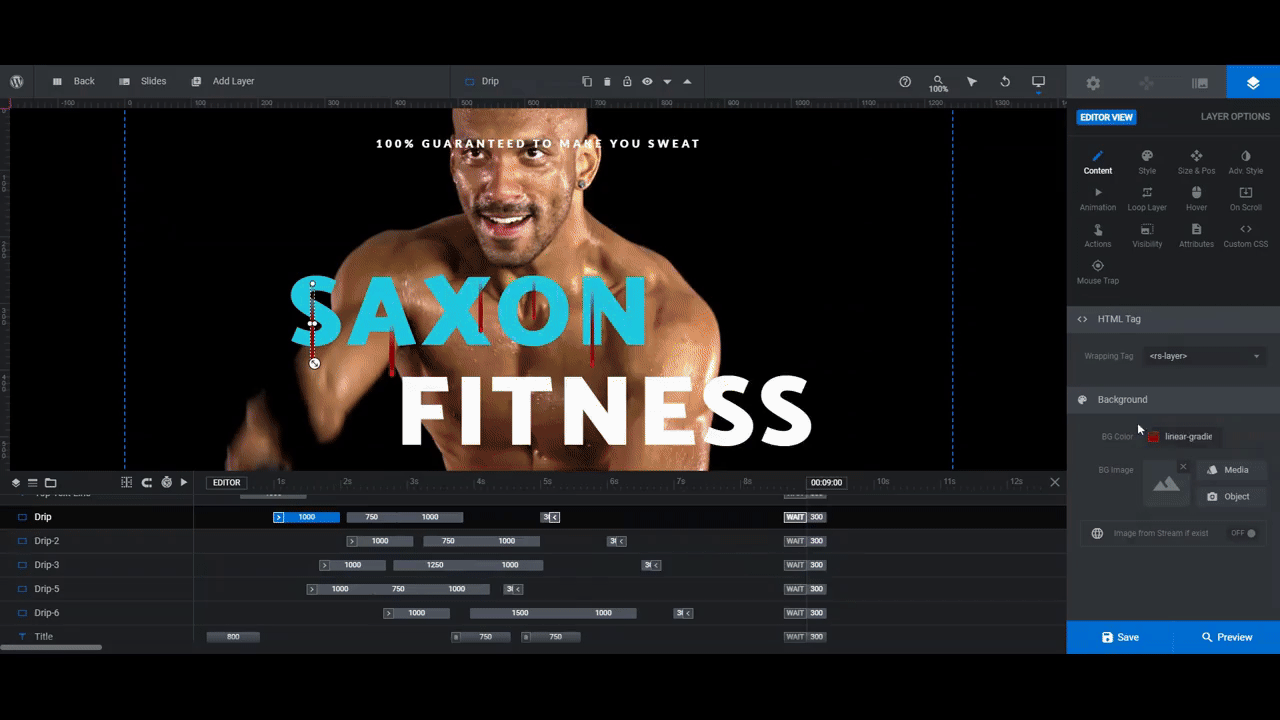
Step 6: Customize the dripping effect
Right now, the dripping effect looks like blood dripping from the title letters. We’re going to change this so that it looks more like sweat.
You can select these layers either in the canvas or the timeline editor. They’re each called Drip-#.
Start by looking at the placement of the drips against your new title. If they don’t line up, you can drag-and-drop them on the canvas or use the “Size & Pos” X and Y settings to move them around. To modify the length, use the H setting.
You can also delete any of the drip layers you don’t need.
If you’ve changed the placement or size of the Drip layers, open up the responsive editor in the top toolbar. Quickly go through and check to make sure the drips are still properly placed over the letters and that the shapes aren’t distorted.
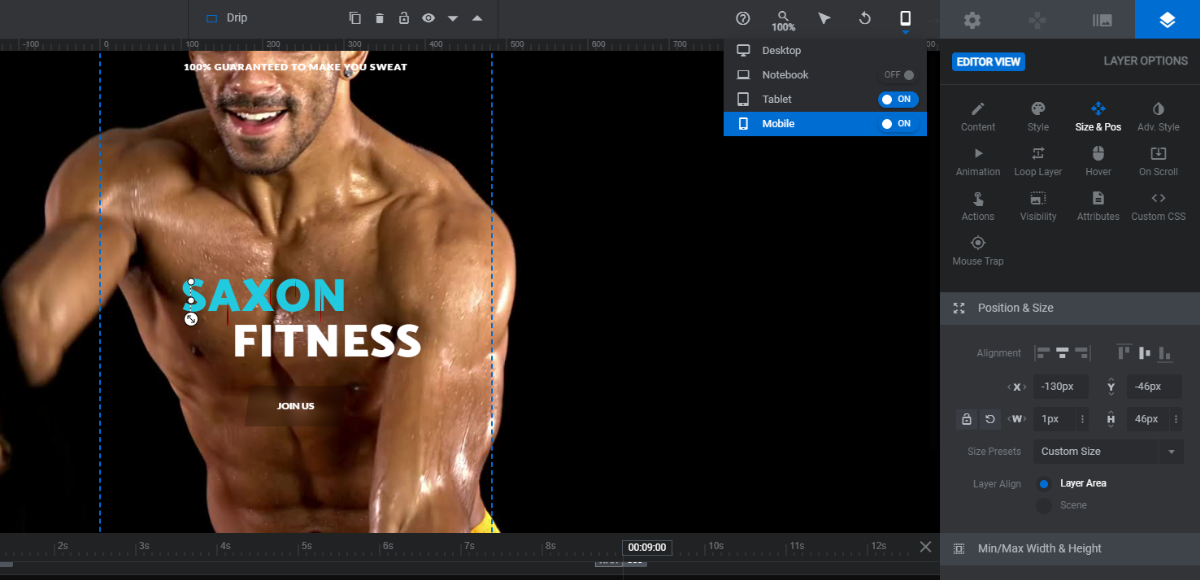
Any changes you make from this view will apply only to the device you’re editing.
Return to the Desktop view. Then go through the Drip layers one by one to customize the gradient.
Go to “Content” or “Style” to locate the BG Color setting. This will open the color selection module.
To keep a similar semi-transparent gradient style, use the color bar to make all your modifications (as opposed to using any of the presets).
Pro tip: You’re going to use this same gradient for each of the Drip layers. To save yourself time editing each, save your new gradient as a custom preset.
Go to the “Preset Group” dropdown and switch it to Custom. Enter a unique name next to Save Preset. Then click the Save Preset button.
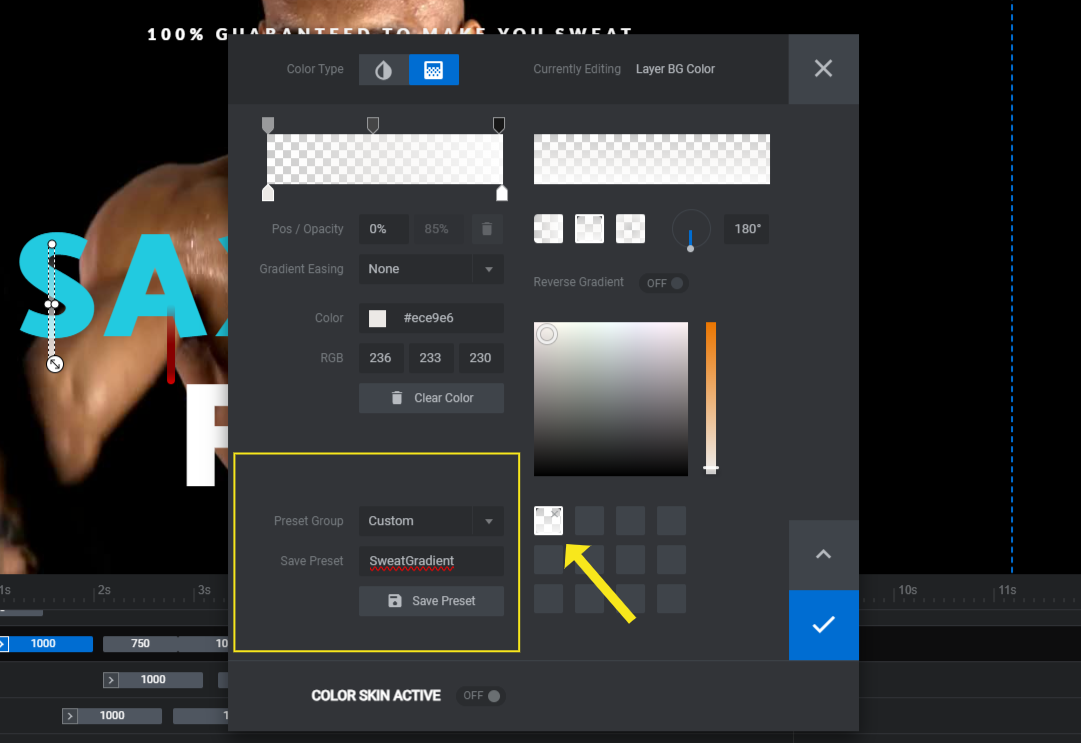
When you go to edit the other Drip layers, you won’t need to recreate the gradient. Just make sure “Preset Group” is set to Custom. Then select your gradient from the right.
Learn more:
- Adding and Configuring Shape Layers
- The Tools of the Color Selection Dialogue
- Checking to Ensure Modified Content Is Still Responsive
Step 7: Adjust the overlay
The Overlay-Red layer is the one that appears when someone hovers over the button. However, this overlay isn’t a solid or semi-sheer overlay. It blends in with the background.
Here’s what you’ll have to do to edit it:
First, locate the layer in the timeline editor. It is currently hidden from view. To change this, hover over the layer and click the crossed-out eyeball icon that appears to the right of it.
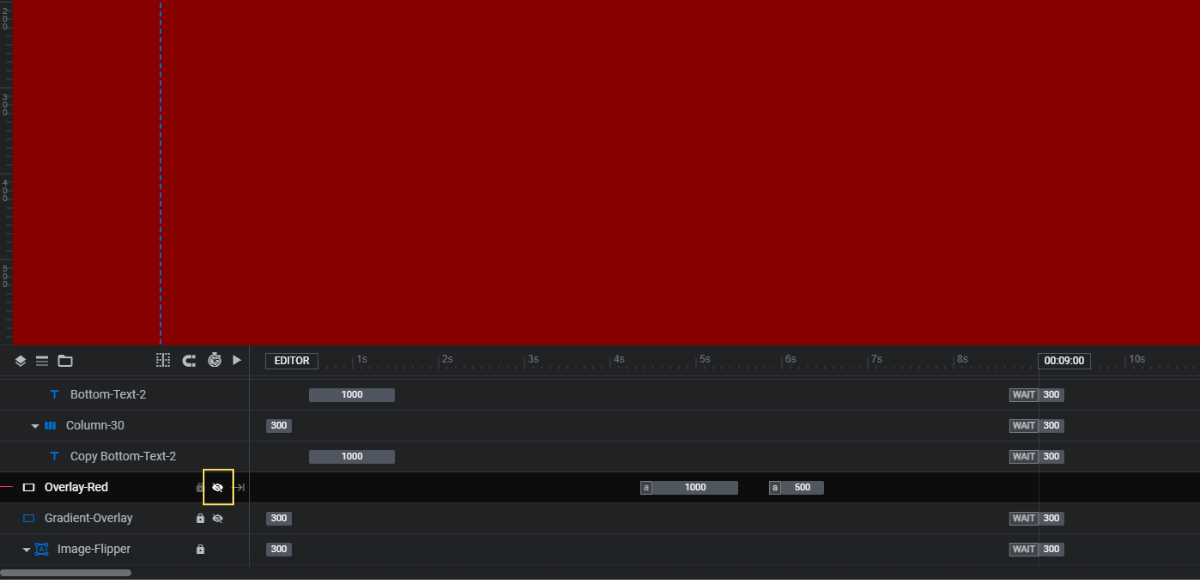
Now you can select the layer and go to “Content” or “Style” to change the color.
Open up the Preview and hover over the button to see how the overlay looks. The blend mode is currently set to darken. If you don’t like the blending effect, you can experiment with the other settings. You’ll find them under “Adv Style” and “Blend Mode”.
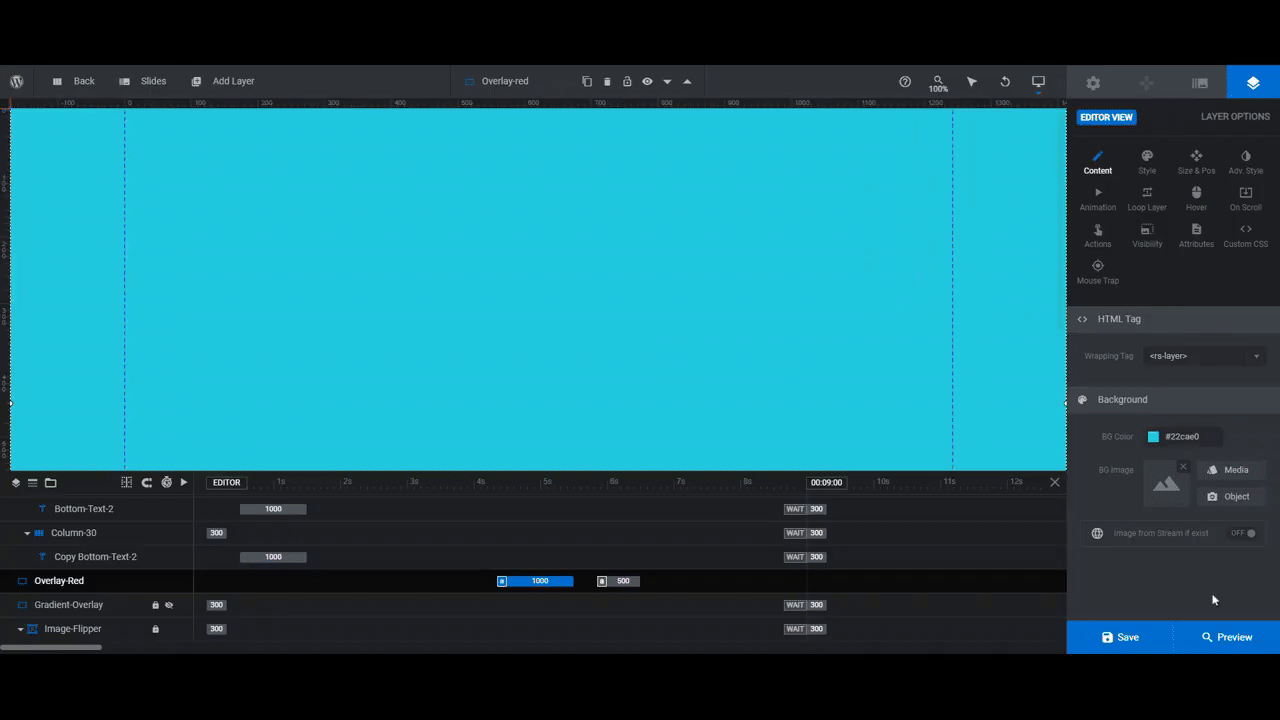
Before you wrap up, rename the Overlay-Red layer to whatever new color you’ve set it to. Just type over the name of the layer in the top toolbar to edit it.

One last thing: Go back down to the timeline editor and click the eyeball icon. This will hide the overlay from the canvas so you can see what you’re working on behind it.
Learn more:
Step 8: Update button and hover effects
The Call-To-Action-Btn is more than just a button layer. This is what transforms the hero image into a blood-red action scene.
Let’s start by editing the basics. Use “Content” to edit the button text. Then use “Style” to change the font and colors.
If you want to change the background color of the button:
- Go to “Style” to modify it in its normal state.
- Go to “Hover” to modify it in its hover state.
The last thing to edit is under “Actions”.
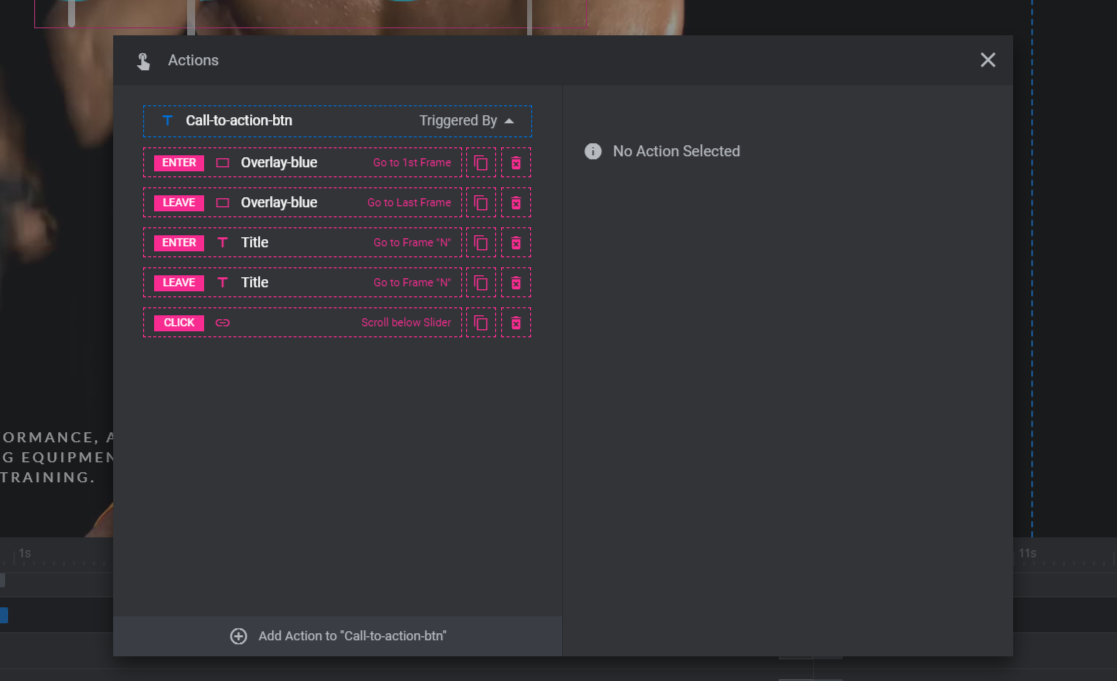
The pop-up will reveal a number of pre-configured actions. You shouldn’t need to edit any of them except the CLICK one at the bottom.
At the moment, it’s set to scroll below the slider. However, if you’d like to point visitors to a membership sign-up form or a free day pass page, for instance, you can do that.
Click the trash can icon to the right of the CLICK action. Then click Add Action to “Call-to-action-btn” at the bottom to generate a new action. Select Simple Link and add the relevant details.
When you’re done updating everything, close the pop-up to save your changes.
You can now embed your finalized design into the home page. One way to do this is by copying the embed shortcode found under “Module Options”. The other is to embed it using the Slider Revolution widget in your page builder plugin.
Learn more:
Using high-impact design to get more customers
Want your fitness business’s website to not only attract more customers, but to attract customers who are hyper-motivated to work out at a facility like yours? Then your home page needs a high-impact image that’s impressive and accurately reflects the level of intensity needed to get great results.
The Hero Slider with Midjourney Image Effect template is the perfect place to start.

