
A website that’s regularly updated is one that feels authentic and is more valuable to visitors and customers. Even if you’re not constantly releasing new goods or services, or don’t have big news to announce, a seasonal or festive makeover can give your site the lively and timely look and feel that visitors appreciate.
In this tutorial, we’re going to show you how to create a hero image template for the holidays using the Happy Holidays Hero template.
Table of Contents:
Creating your template:
- Step 1: Figure out the general structure for your hero image template
- Step 2: Strip out the elements you won’t need
- Step 3: Add a button layer
- Step 4: Adjust the placement of the remaining layers
- Step 5: Customize the typography styles
Creating your custom hero images:
- Step 6: Save the template and duplicate as needed
- Step 7: Customize the foreground image
- Step 8: Update the text layers
- Step 9: Update the background
- Step 10: Customize the particle effects
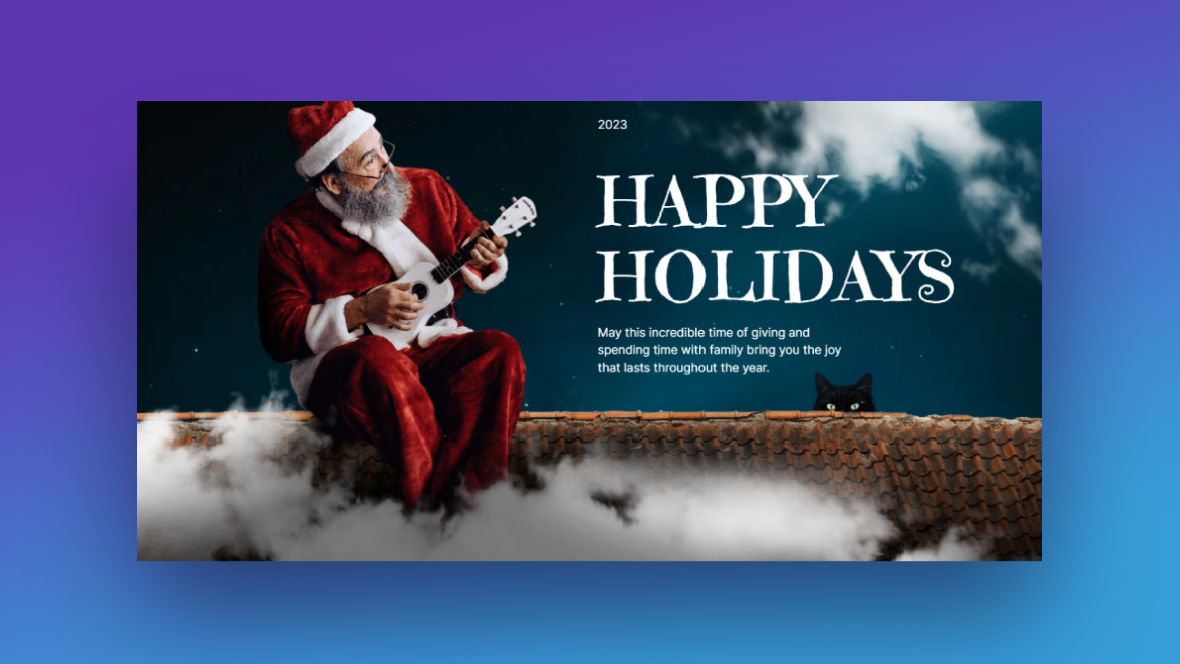
How to create a hero image template to use around the holidays
Have you ever visited a competitor’s site and felt envious that they had the time to create a custom holiday-inspired banner to their home page? If you templatize the design, it won’t take you long to do so either.
Create a hero image template from this one with your own branding, tweak the layout and components, and then use it anytime you want to give your homepage a festive feel. Here are some samples of holiday designs you can quickly churn out with a template:
- Valentine’s Day
- Father’s Day
- Semi-Annual Sale
If you’ve never used Slider Revolution before, check out these quick-start guides first:
Step 1: Figure out the general structure for your hero image template
The goal in creating a template for your hero image is so you can quickly get holiday-inspired content on your site.
While the imagery and copy will differ from holiday to holiday, you can use the same structure and formula in putting it all together. This will make it super easy to customize the hero image as a new holiday approaches.
Take a look at the structure of the existing design and figure what you want to do with it:
How much of the structure can you preserve? Do you want to keep the layout the same? Are there certain elements you can remove? Any you need to add?
Come up with a general idea of what sort of design will work for your holiday hero images. Then move onto the next step.
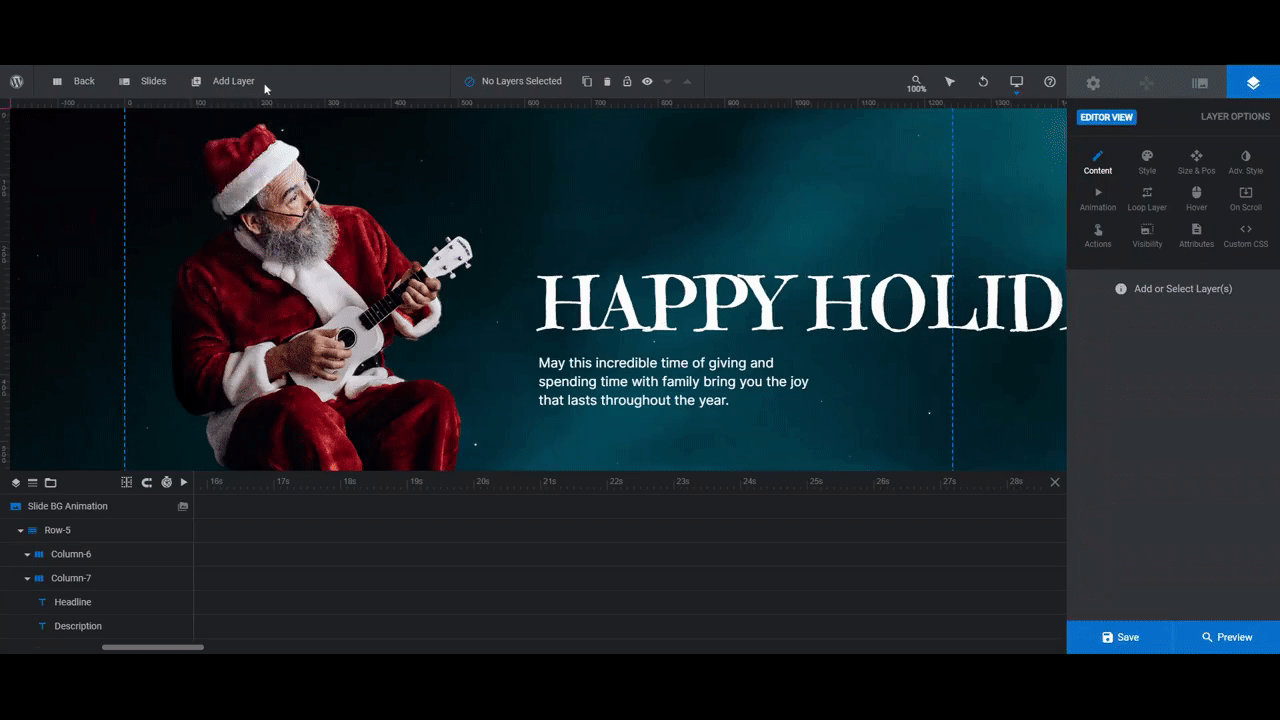
Step 2: Strip out the elements you won’t need
You can make your hero image template as complex or simple as you like. The more you simplify the design, the easier it will be to update. Aim to find a good in-between so that your design is visually interesting without being overwhelming.
If you’re planning to remove any of the existing layers, go to the timeline editor at the bottom.
To delete a layer, select it and hit the Backspace or delete key. You can also delete entire groups of elements by selecting the row or group name and it will get rid of all the layers within it at once.
Pro tip: You can delete multiple layers simultaneously. Hold down the Ctrl or command button and then select the elements to delete.
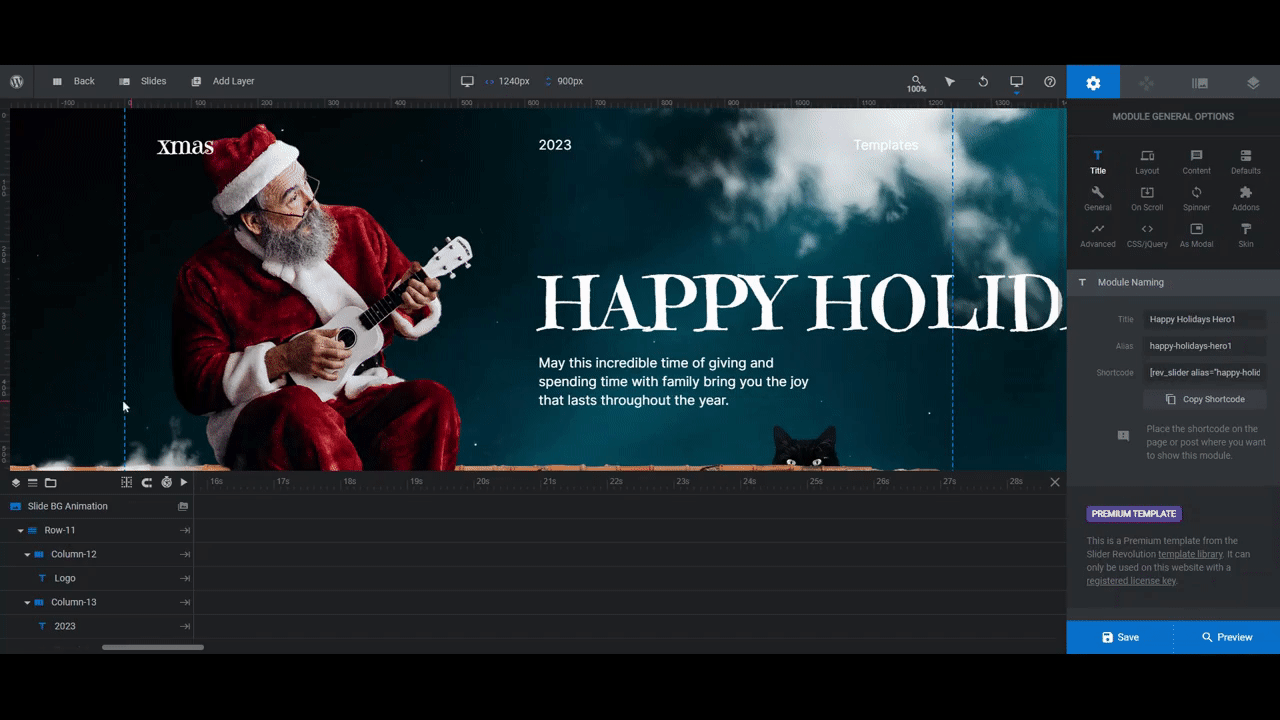
For the record, here is what we stripped out of our design:
- Row-11 — The header row of links
- Copy-Row-11 — the footer row of links
- Cloud1
- Cloud2
- Roof
- Cat
When you’re done removing the layers you don’t need, save your changes.
Learn more:
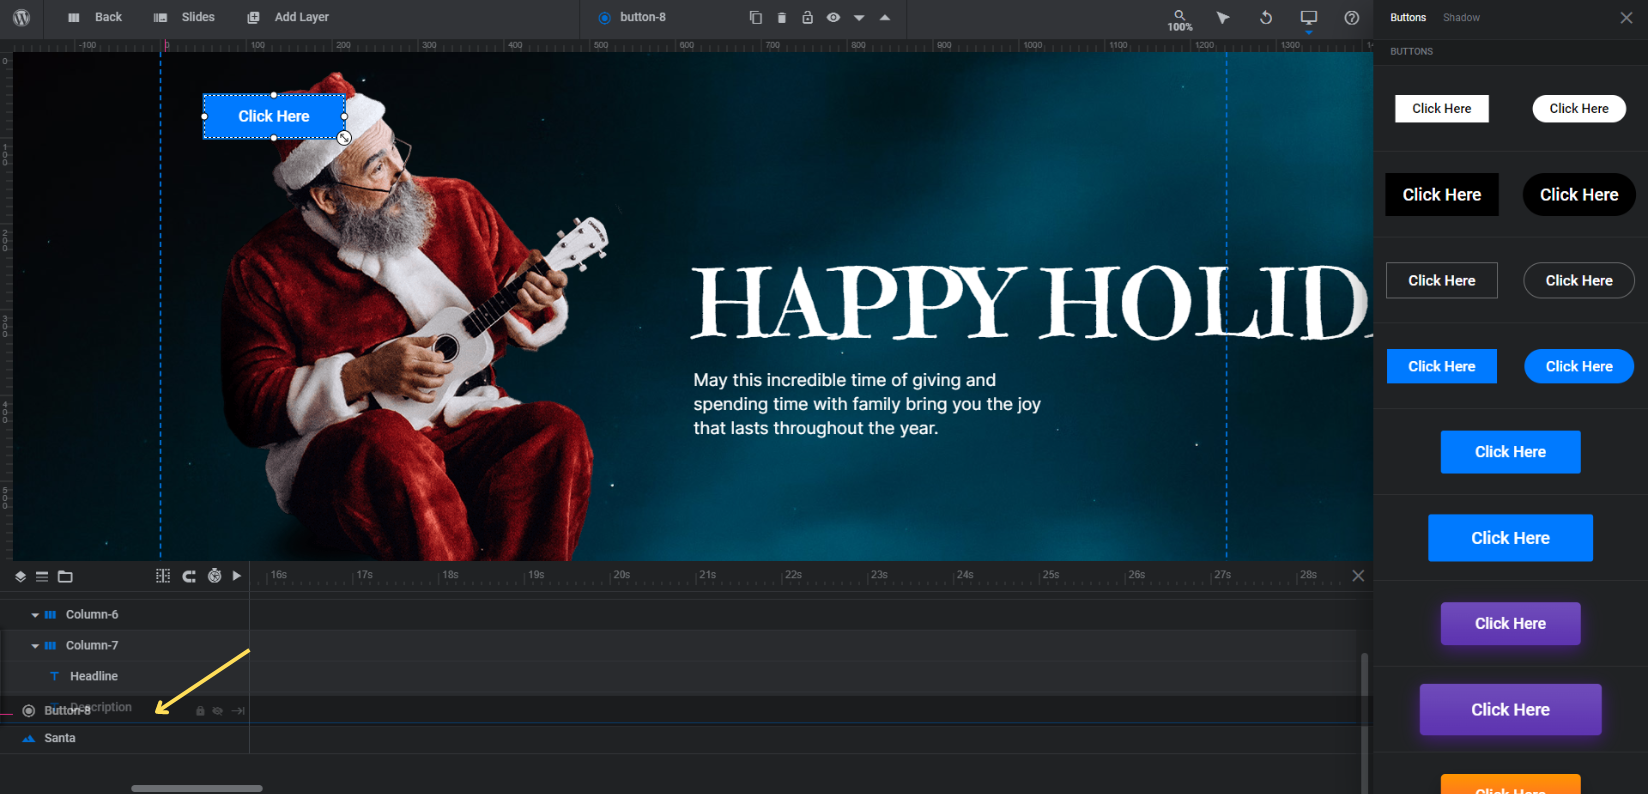
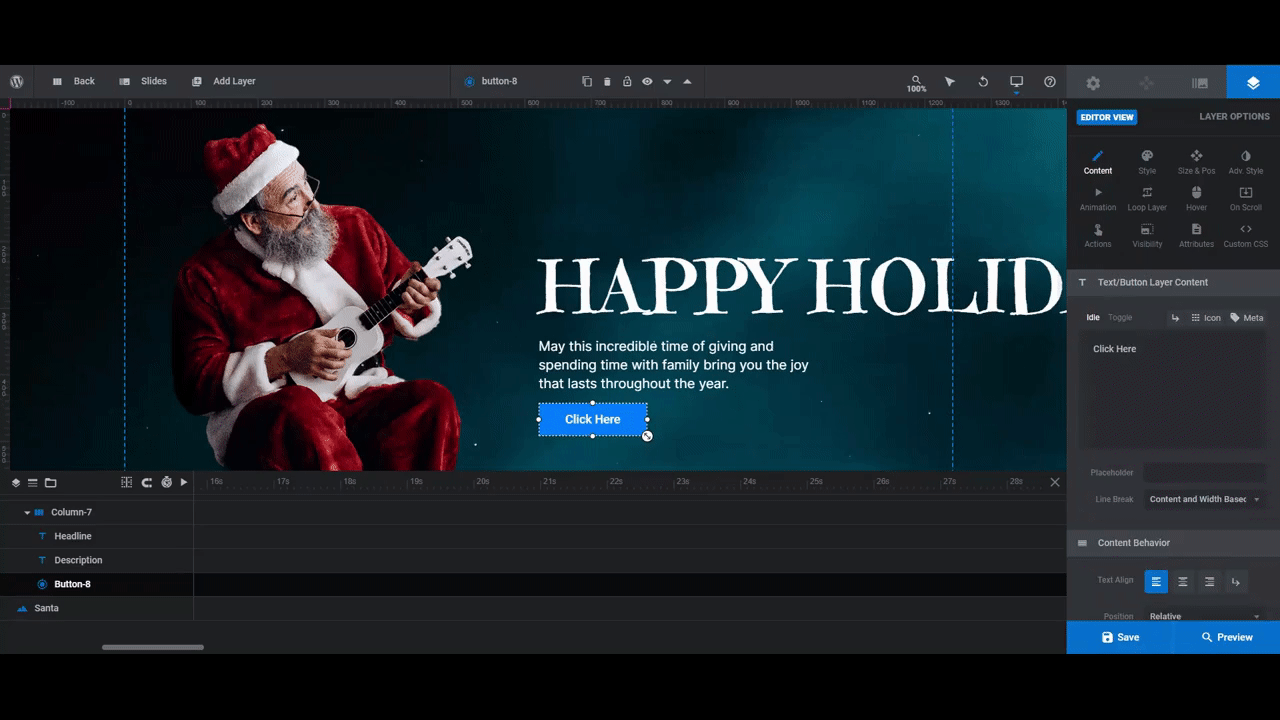
Step 3: Add a button layer
We’re going to add a new button layer underneath the Description. If you need to add different layers, do so in this step before moving on.
To add a button to the hero image, go to “Add Layer” in the top toolbar and click Button. A sidebar will appear on the right with a variety of premade button styles. Choose the one that’s closest to the look and functionality you want (hover over the button to see how it reacts):
Don’t stress too much over what the button says or the colors within it. You’ll customize these things once you have a new hero image to create.
For now, focus on adjusting the button characteristics that won’t change from hero image to hero image.
To move the button to its permanent position in the slide, go to the timeline editor. Drag the new Button-8 layer into the group called Column-7. Place it just beneath the Description:
This will move the button into the column, but it won’t perfect its position.
To do this, go to “Layer Options” and “Content”. Scroll down and change its “Position” from Absolute to Relative and its “Float” setting to Left:
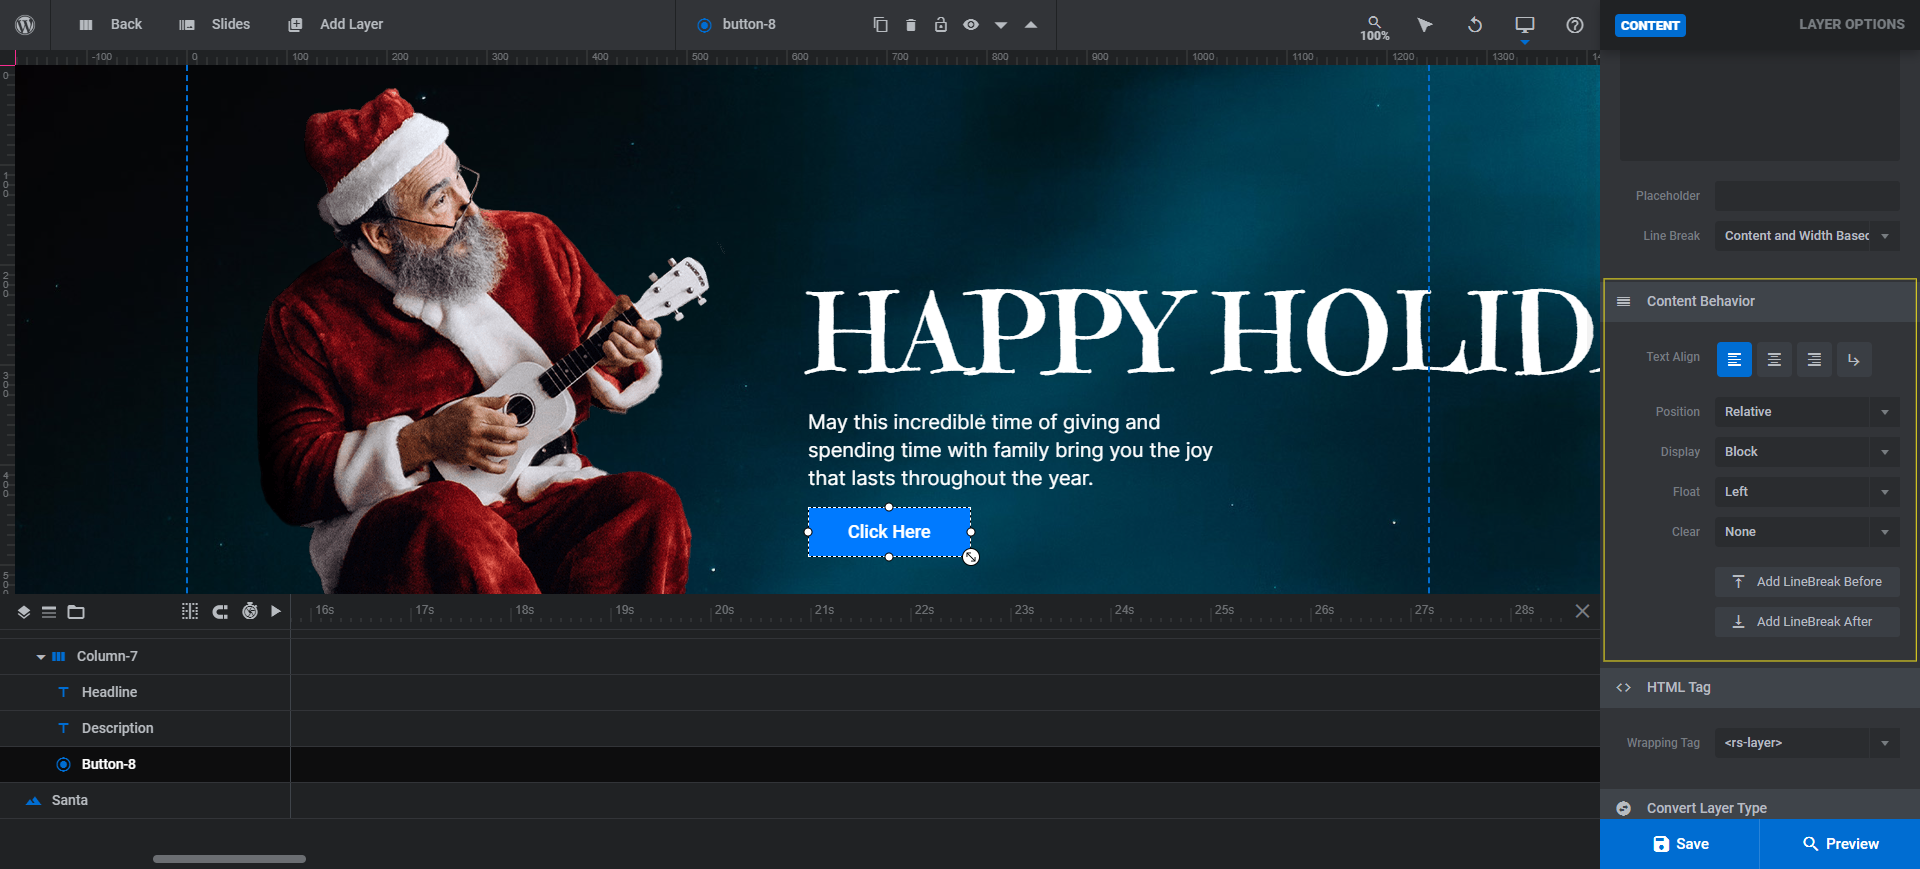
Note: To edit the placement of layers not contained within groups, use “Size & Pos” settings instead.
If you need to tweak the button’s general styles, hover effects, or animations, now is the time to do so. Again, don’t worry about adding color or editing the text.
- Go to “Style” to update the font, adjust the weight, add a border, and so on.
- Go to “Adv Style” to play around with shadows and other advanced features.
- Go to “Hover” to modify hover settings.
- Go to “Animation” to change how the button loads on the screen.
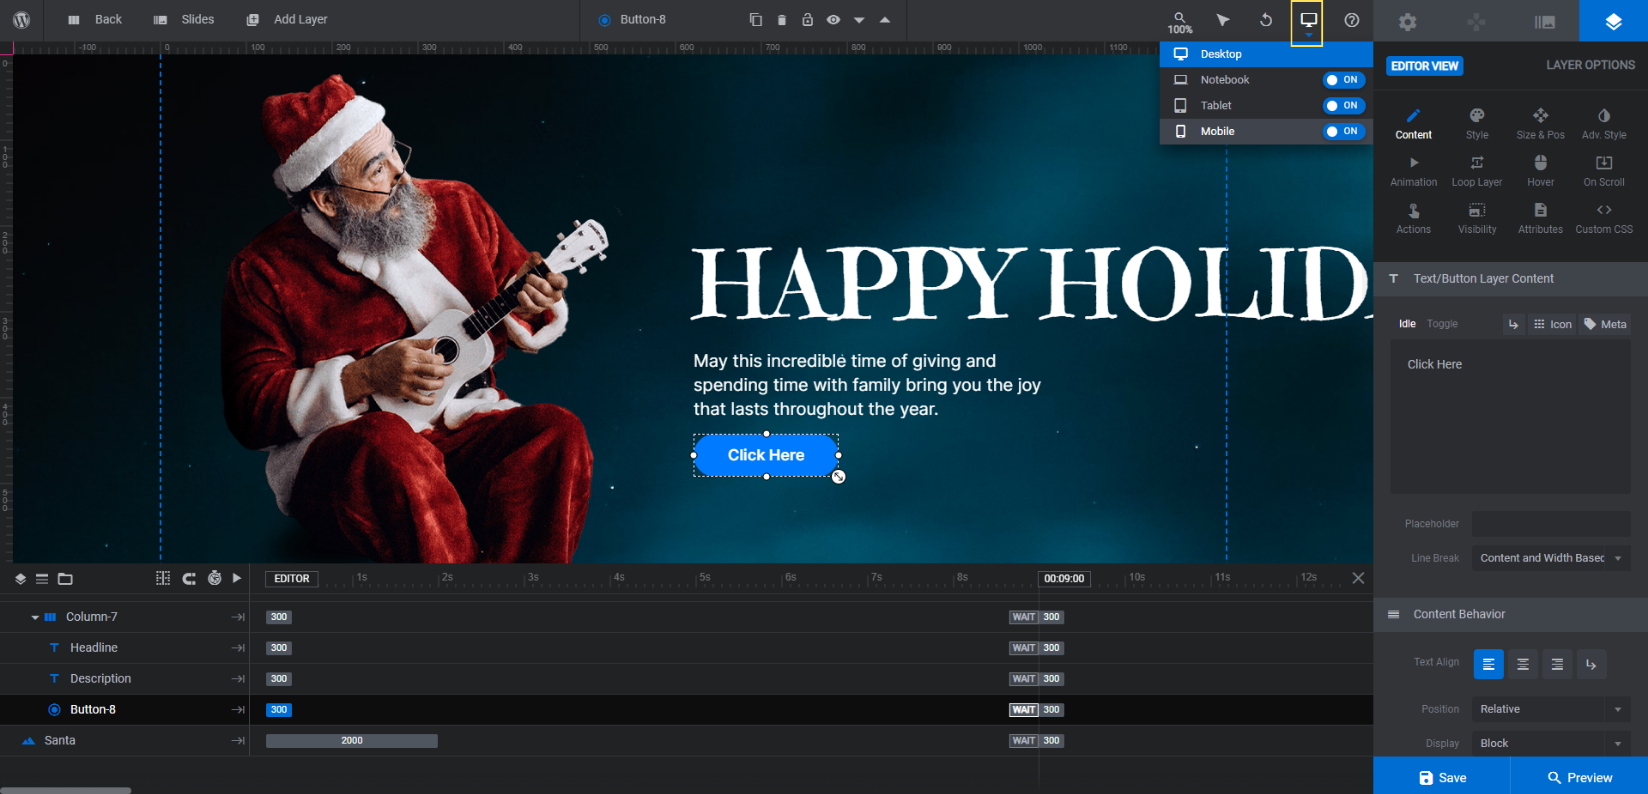
Before you save your changes and move on, do a responsive check to ensure that any new layer you’ve added looks good on smaller screens. You’ll find the responsive variant switcher in the top toolbar:
When you’re done editing the layer, save your changes.
Learn more:
Step 4: Adjust the placement of the remaining layers
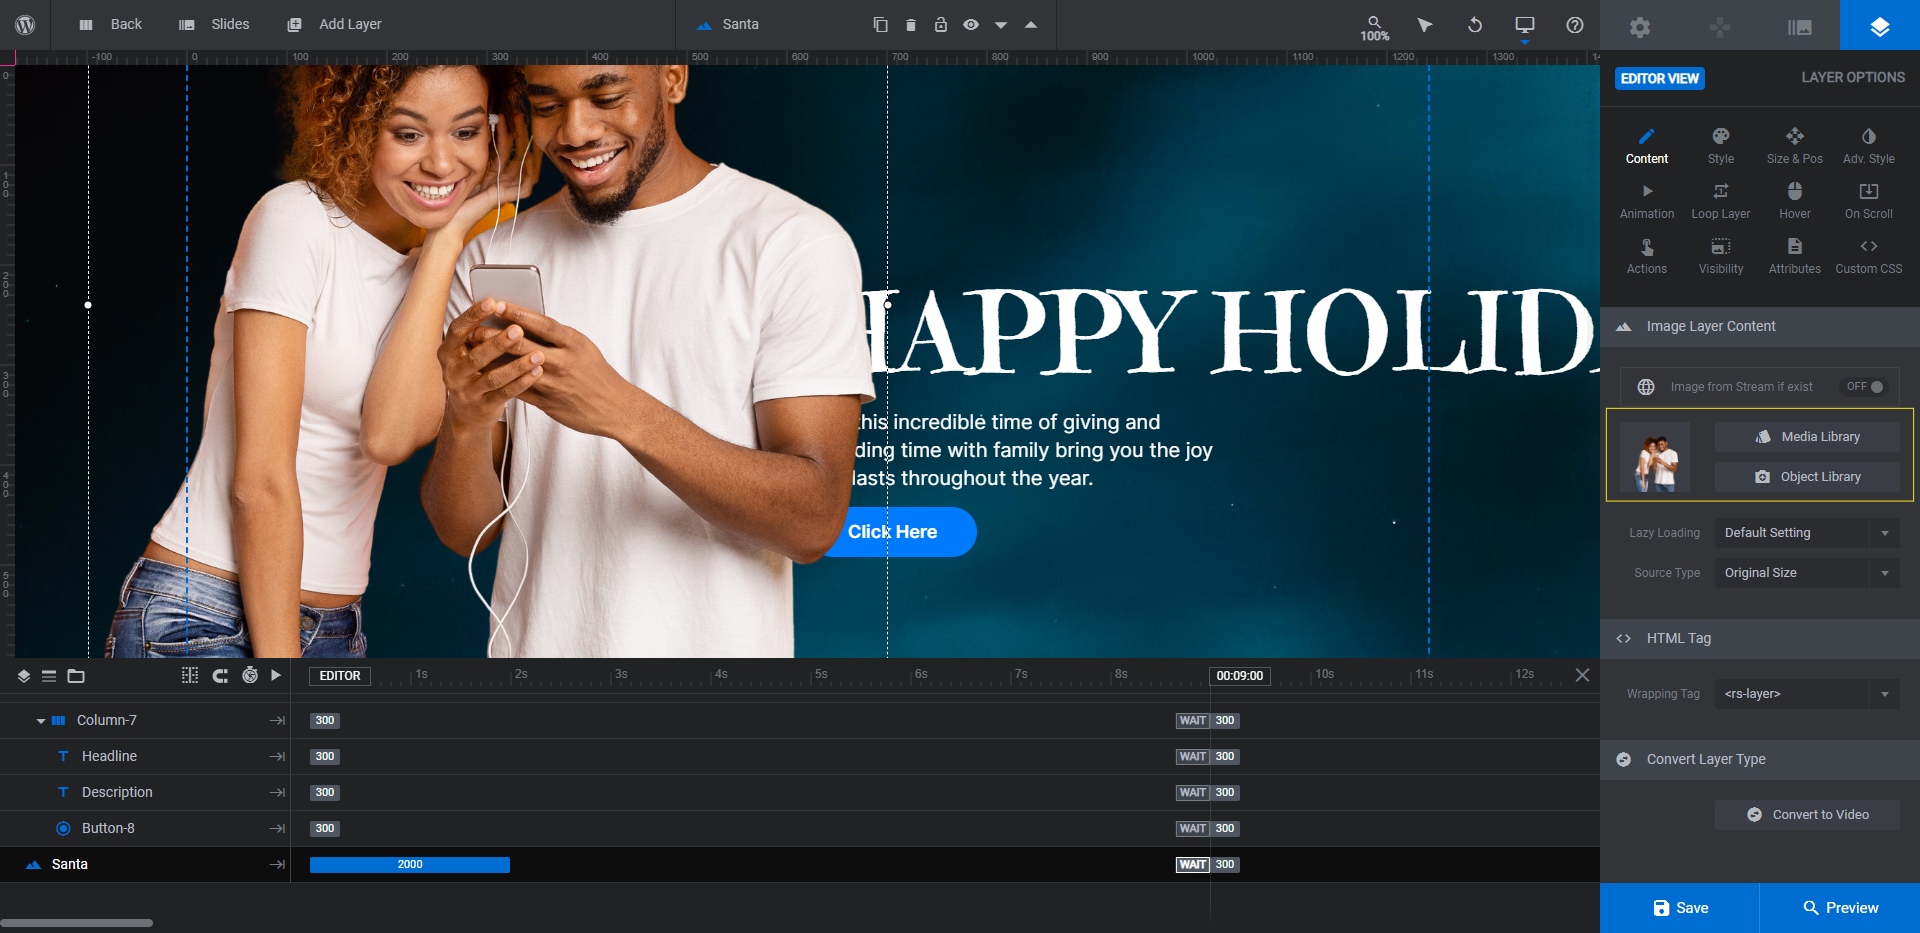
The text and button layers contained within the column need no adjusting. However, the Santa layer does. If you kept any of the other image layers from the original design, you’ll need to edit them in this step as well.
In order to get the size and placement right for our main graphical element, we’re first going to import a sample image. To do this, click on the Santa layer in the timeline or canvas. Then go to “Layer Options” and “Content” to upload the file to the Media Library:
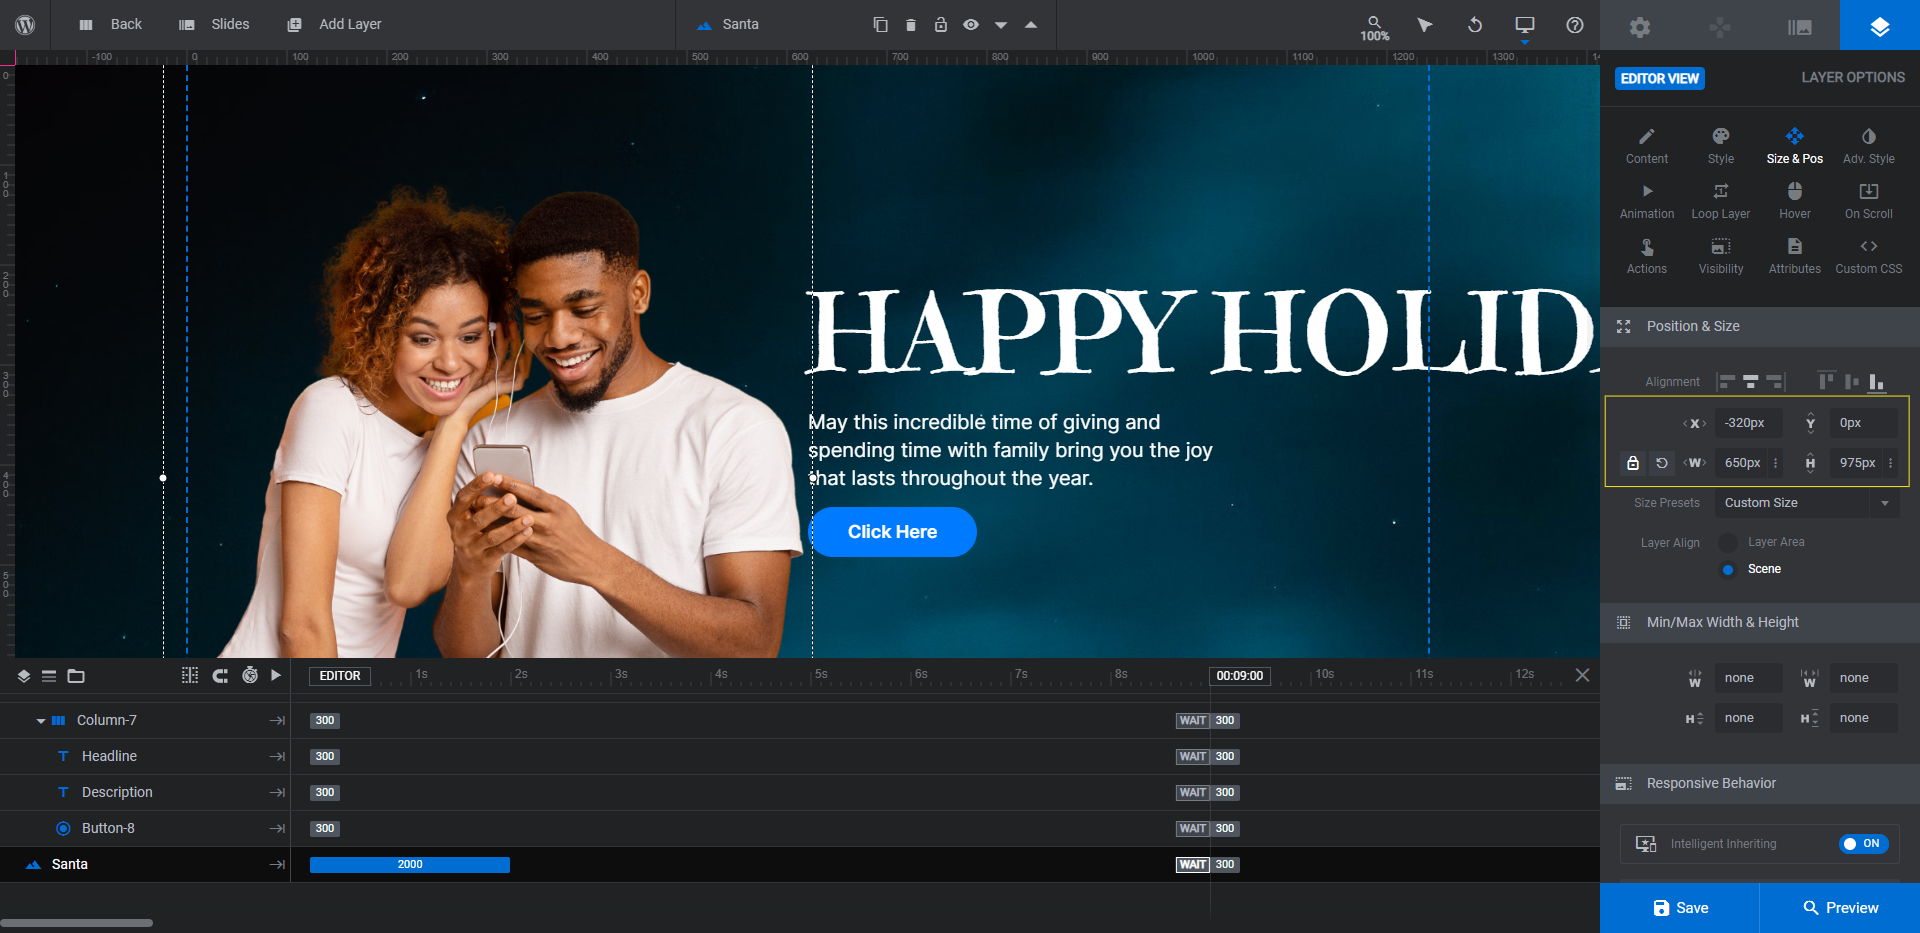
Next, go to “Size & Pos”.
Use the X and Y values to move the image left or right and up or down. Use the W value to adjust the width of the image so that it better fits the space it’s in:
Pro tip: When choosing images for your holiday hero image, try to find ones that are the same size and proportion as your sample image. That will reduce the need to edit the image later on.
Before you save your changes, do another round of responsive editing if you modified either the size or position of your image.
Learn more:
Step 5: Customize the typography styles
The last thing to do to finalize your template is customize the typography.
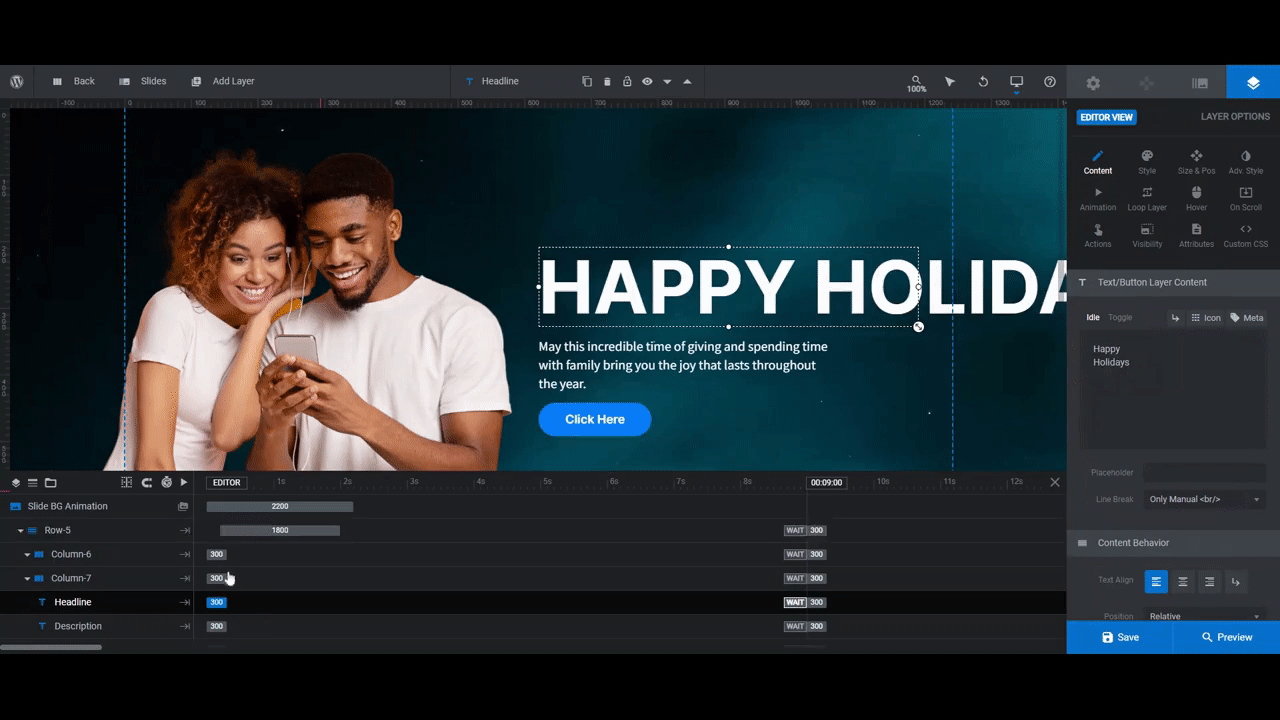
You don’t need to edit what the text says at this stage. Instead, select the Headline and Description layers one by one. Then go to “Layer Options” and “Style” to make changes to the font and style of the text:
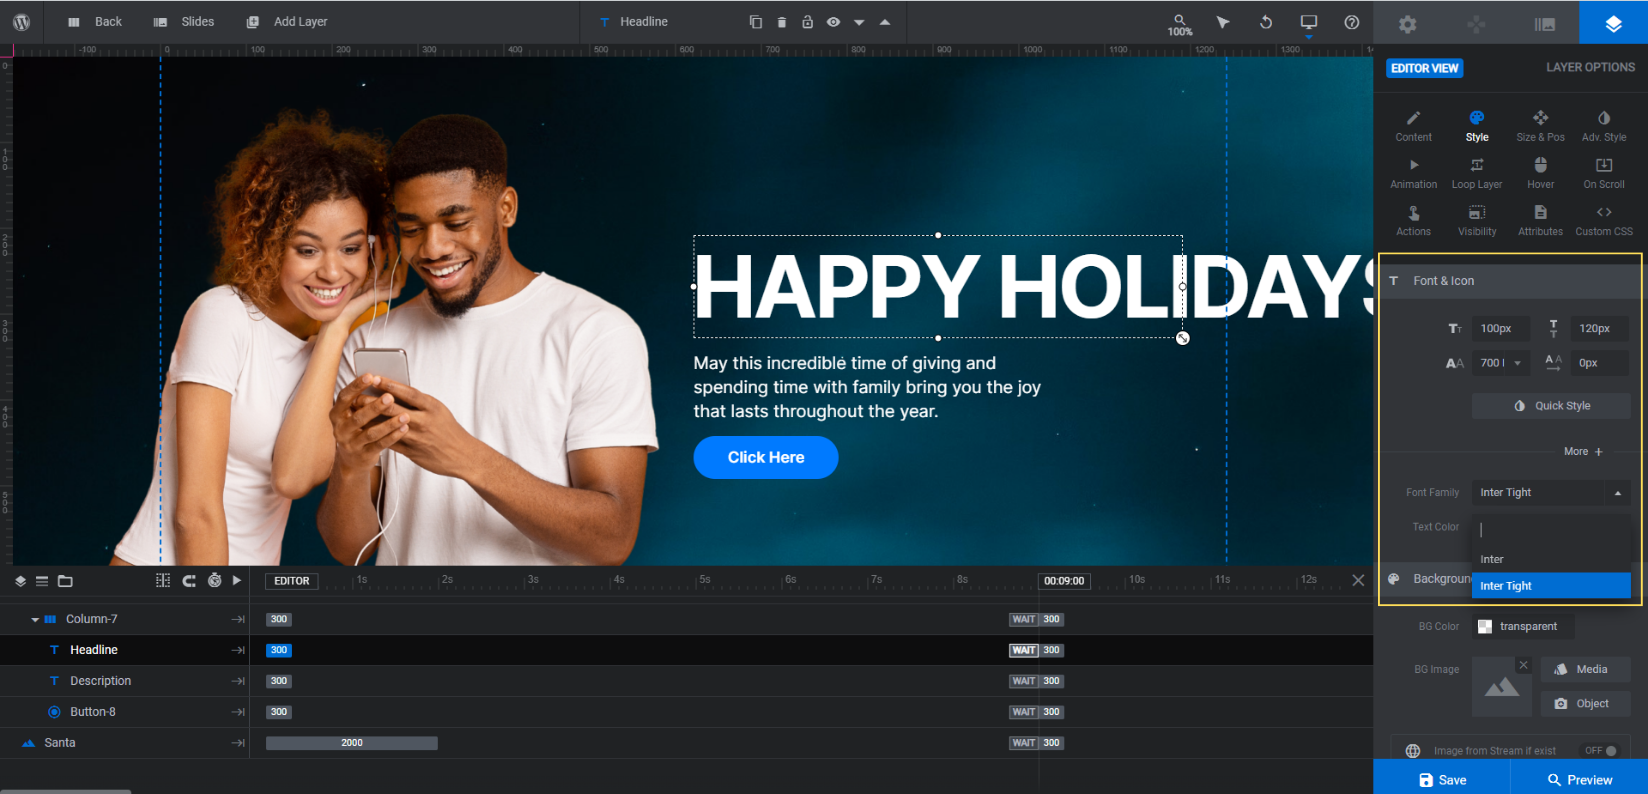
Pro tip: Since you’re going to use this template for all holidays, don’t use a font that has a festive feel. Instead, use one that matches your branding so you don’t have to worry about changing it from month to month.
When you’re done, save your changes.
Learn more:
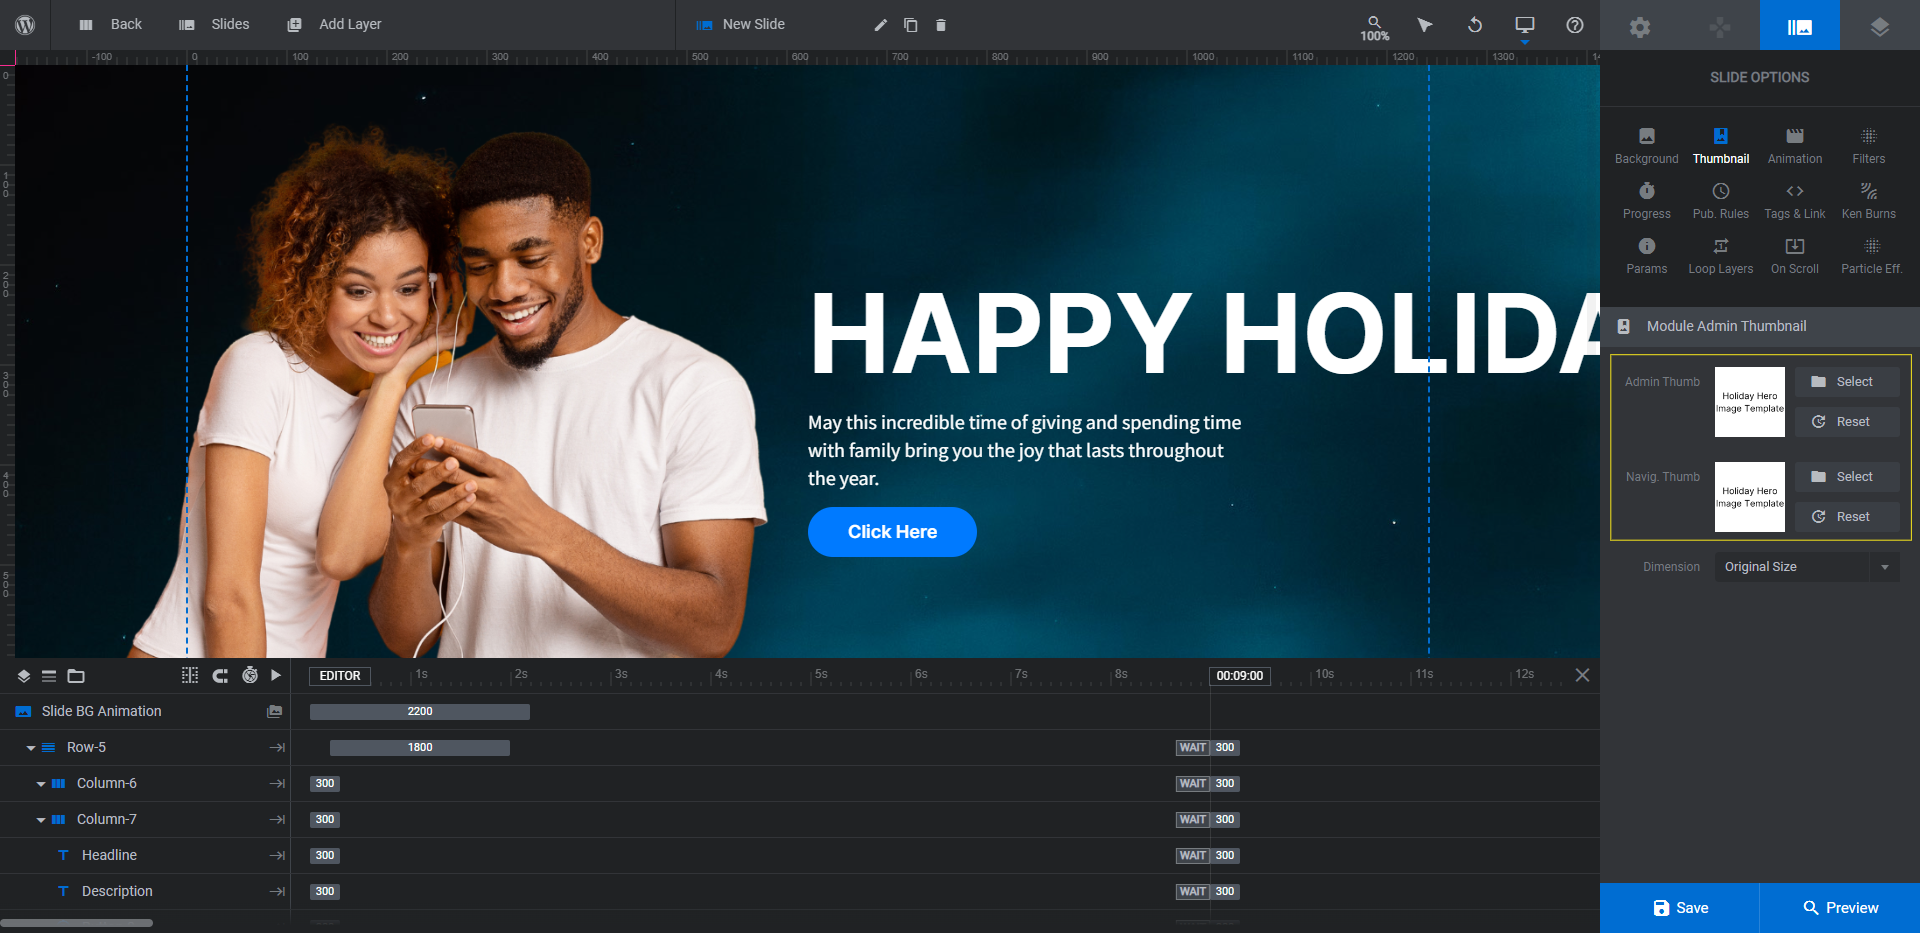
Step 6: Save the template and duplicate as needed
The template as it stands now isn’t something you’d want to put on your site. However, it’s going to make much lighter work of creating your holiday hero images going forward.
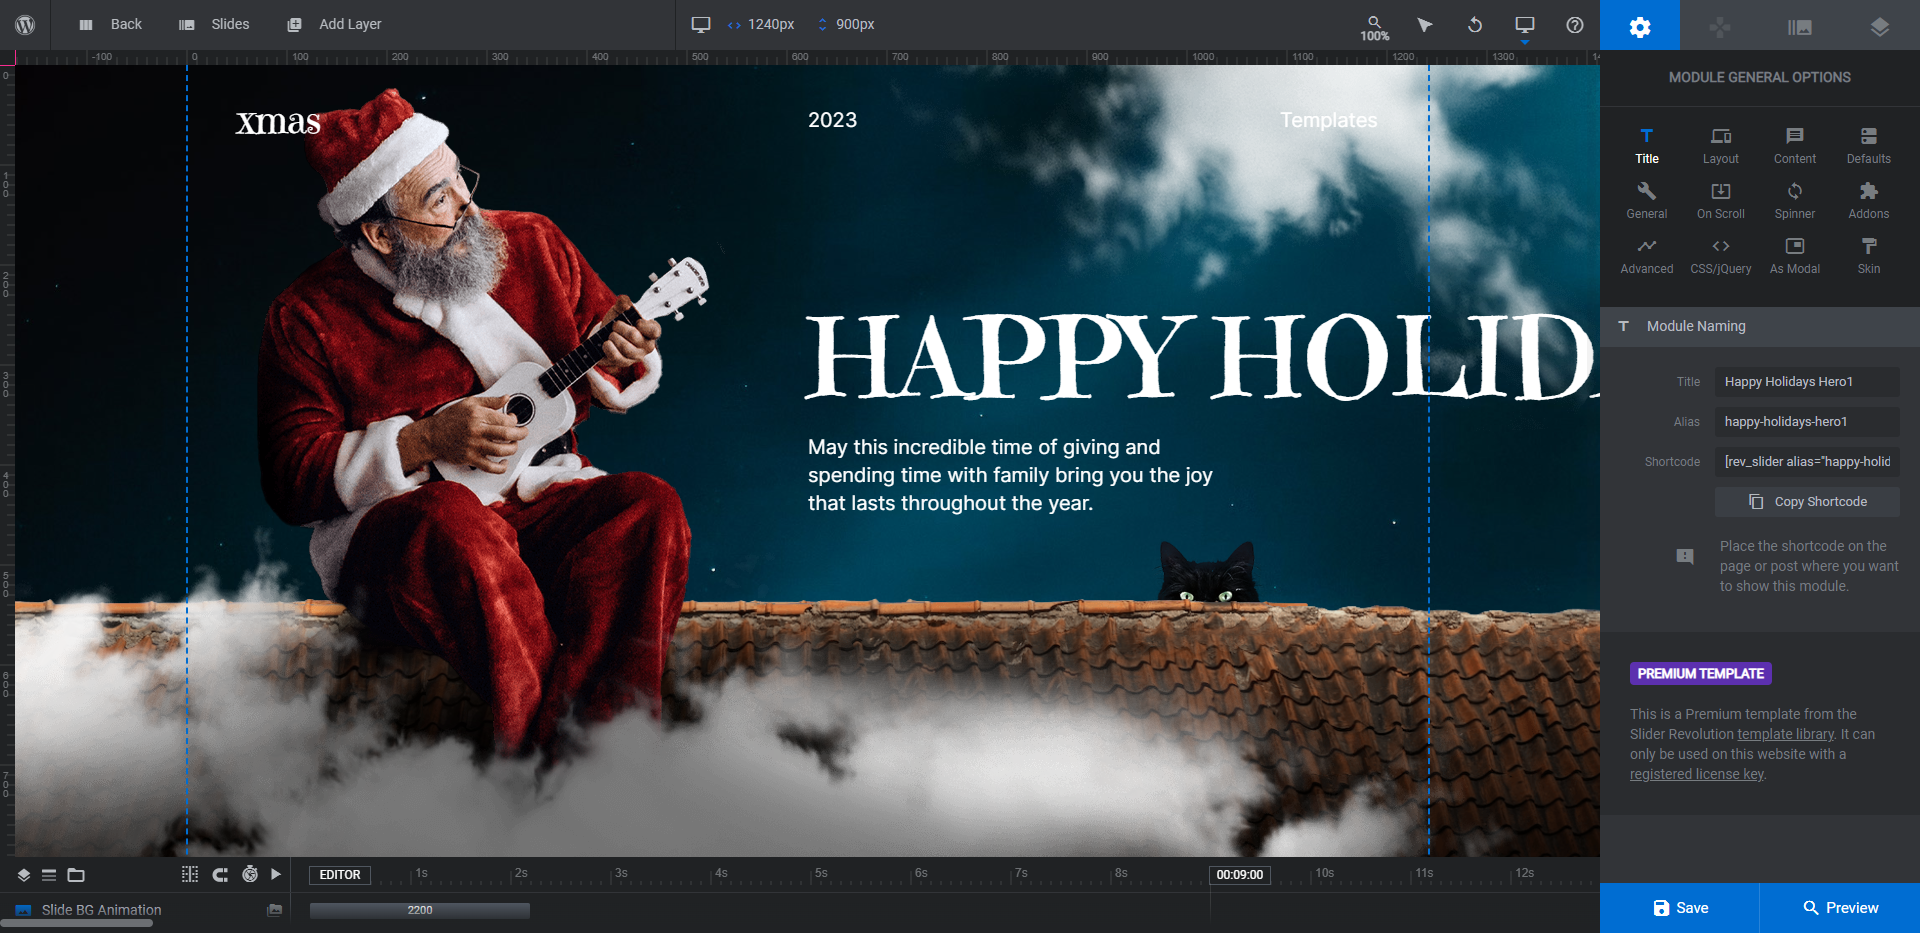
To save the template for easy retrieval later, first go to “Slide Options” and “Thumbnail” to upload a new thumbnail image. Ours is a plain text card that says “Holiday Hero Image Template” so we can easily find it amongst our other Slider Revolution designs:
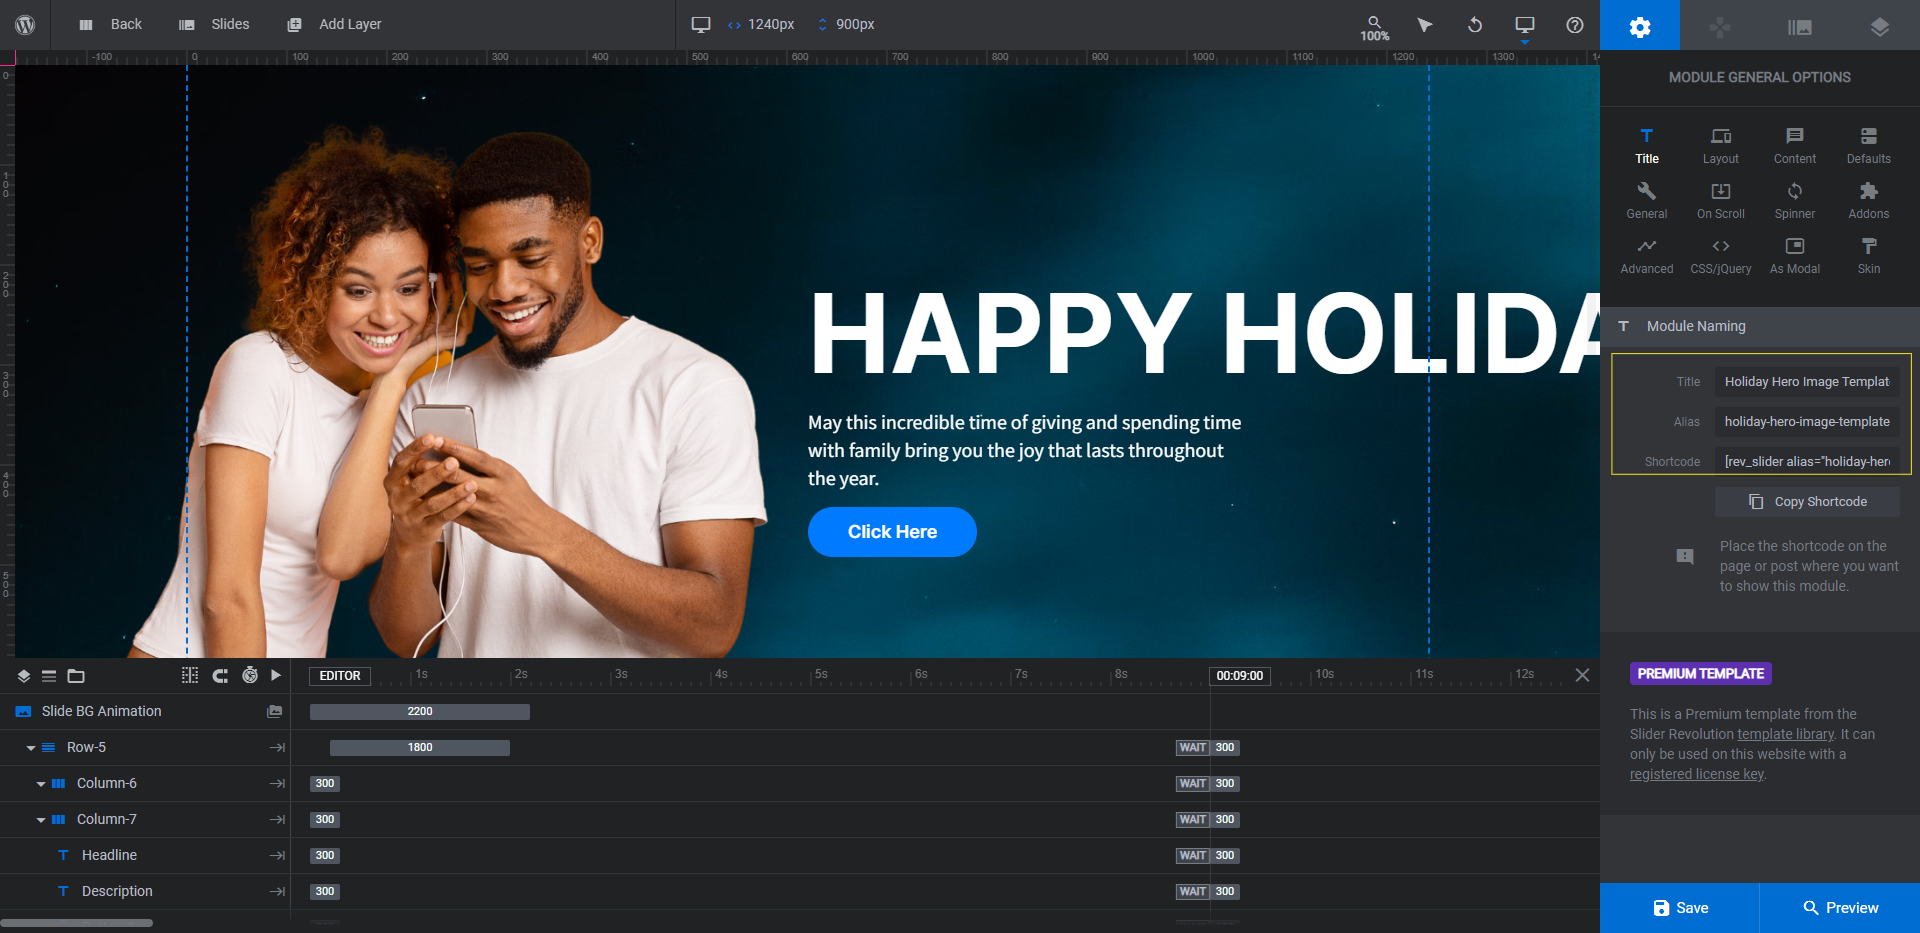
Next, go to “Module Options” and “Title”. Update the name and alias of the file so the title lets you know that it’s the template you designed for this purpose:
Save your changes and exit out of the Slider Revolution editor.
Pro tip: Bookmark this tutorial. When you’re ready to create a new holiday hero, use Steps 6 through 10 to ensure that you don’t miss anything when you customize the template.
You won’t want to override the work you’ve done in this template (just in case you make major changes to the design). Instead, hover over your template file, click the down-arrow, and click “Duplicate”:

Give the new file a relevant name and then get to work on updating the design. We’ll walk through the remaining steps next.
Step 7: Customize the foreground image
The Santa image in the design will need to be swapped out for each new hero image you create. (The same goes for any other image layers you kept in the design.)
To do this, click on the layer and go to “Layer Options” and “Content” to upload the new file.
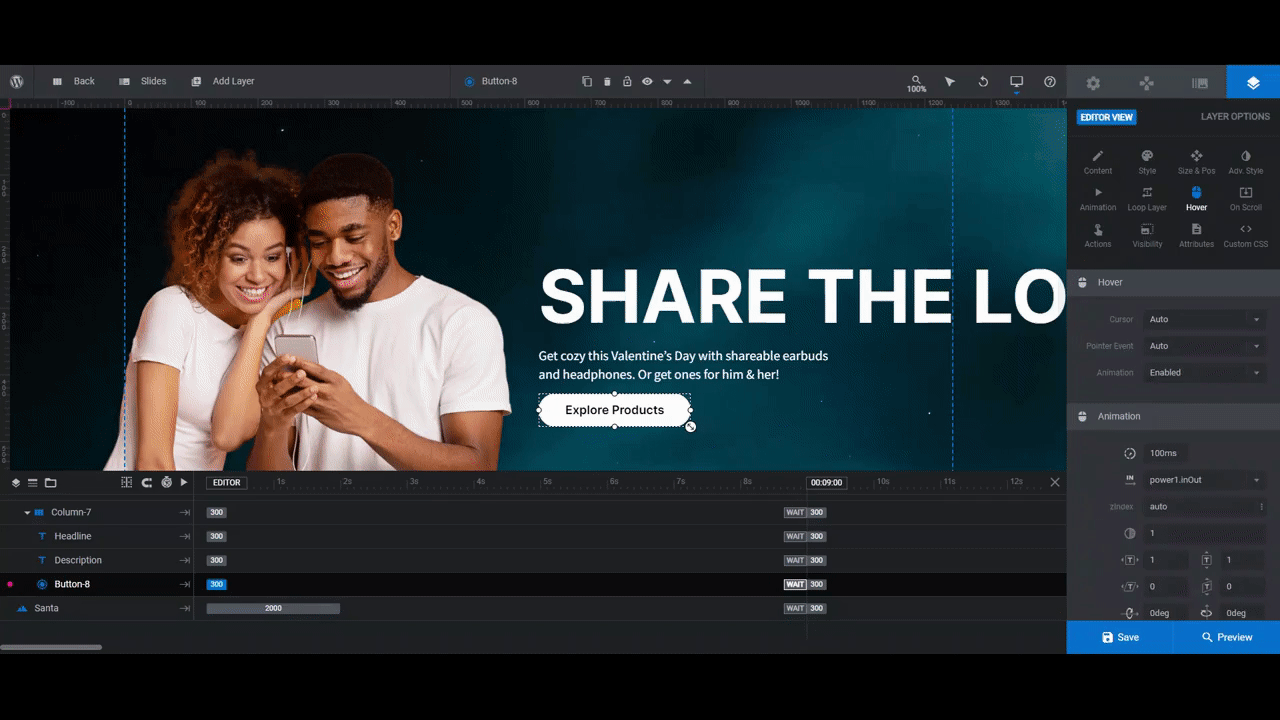
Step 8: Update the text layers
The Headline, Description, and Button layer text needs to be updated in this step. Select each layer and edit the text under “Layer Options” and “Content”:
Tip: If your headline doesn’t neatly fit on one line, hit the Enter or Return key to force words to the next line.
If you added a button to your design, customize the button color under “Style” and “Hover”. You can save this step until after you add your new background if you’d prefer. It may be easier once you have the backdrop colors in place.
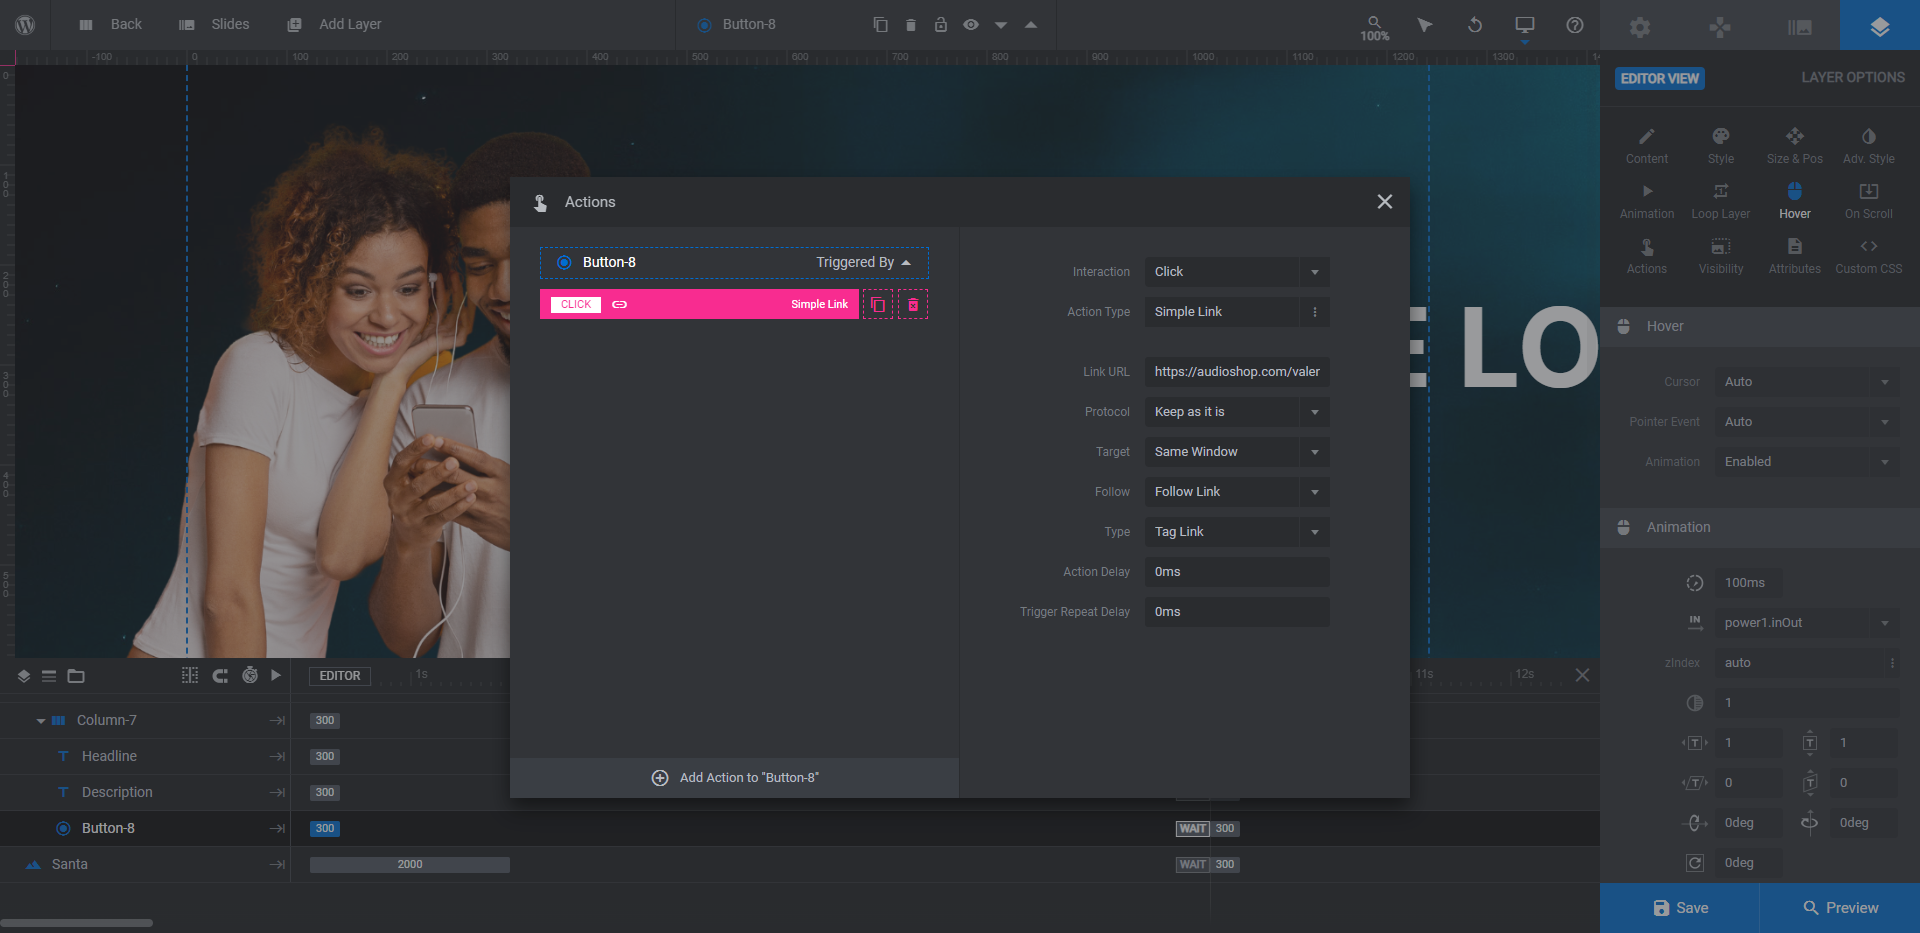
One last thing to do is to make your button layer active. To do this, go to “Actions”. Under “Link Actions”, select Simple Link. Then add the corresponding details for the internal page link:
Save your changes when you’re done.
Learn more:
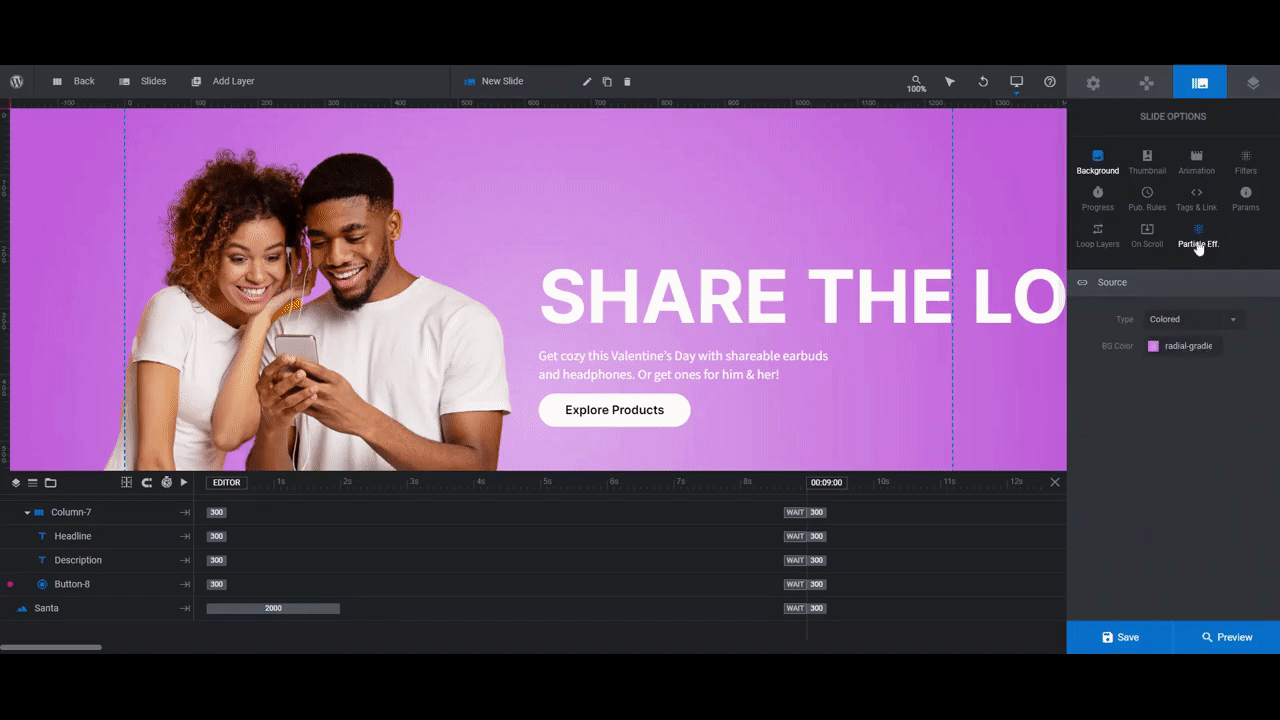
Step 9: Update the background
Currently, the background is an image. You can follow suit or you can replace it with a color or gradient.
To change the background, go to “Slide Options” and “Background”. To use an image, upload a new one to the Media Library.
To switch to a color, select “Colored” from the dropdown options. Then open the color selection modal. You can either set the background to a solid color or a gradient. Use the tabs in the top-left corner to switch between the two:
Feel free to use one of Slider Revolution’s preset colors or gradients and make tweaks to them. Or you can create your own.
Learn more:
Step 10: Customize the particle effects
The last thing to update is the particle effects. In the Christmas hero image, the particle effects mimic falling snow. However, you can use them to create all sorts of themed backdrops.
You’ll find all of the available particle effects under “Slide Options” and “Particle Eff”. Click the arrow next to Particle Effects Library to see all of the options.
For our Valentine’s Day design, we’re going to use the effect called Valentine’s Day.
You won’t be able to see the particle effects in the canvas, so you’ll have to open your preview in order to see what they look like. To make adjustments, use the settings below the presets:
You can change the number of particles, use a different icon shape, edit the color and size, and so much more. You can also adjust how they move around the hero image.
Don’t worry if your holiday isn’t represented in the library. You can easily customize these particle effects so that they fit the theme of your design. For instance, we customized the Party Stars effect for our Father’s Day slide and the Moving Markets effect for our Semi-Annual Sale. You can see how these turned out at the top of this post.
Learn more:
Give your homepage a quick festive makeover with this template
Sometimes all you need to make your home page more festive is some updated copy and a themed particle effect. But you’ll have much more work to do if you don’t first create a hero image template.
By turning the Happy Holidays Hero into a reusable template, you’ll have no problem quickly whipping up a holiday-themed design going forward.

